How to Paint With Stencils Without Bleeding: Tips for Painting With Stencils Like a Pro
If you’re looking for an easy and rewarding DIY project, look no further than painting with stencils. Not only is it a fun activity that anyone can do at home, but it also produces beautiful results if done correctly. But painting with stencils is not without its challenges. One of the biggest problems that novice painters face is paint bleeding under the stencil, which can lead to smudged edges and sloppy results. Fortunately, there are some simple steps you can take to ensure your stenciled masterpiece looks perfect every time! Read on for our tips on how to paint with stencils without bleeding.
Never heard of Mesh Stencils?
These thoughtfully designed and patented Tri Mesh adhesive stencils can be combined with a variety of surfaces to create endlessly customized DIY home décor.
What you'll love:
- Create beautiful stenciled words and imagery for any occasion!
- Use over and over again on almost any surface and with almost any finish, from Rescue Restore Paint to ChalkArt and even gilding.
- New and improved design features stronger adhesive, easier cleaning, and simpler transfer between different surfaces.
Grab your favorite stencil designs and start adding artistic elements to your furniture and accents without any drawing or painting skills!
Check out all the A Makers' Studio Mesh Stencil designs here!

What Kind of Paint to Use With Stencils: All Your Options Explained
The first step in successful stenciling is choosing the right kind of paint. A Makers' Studio mediums are specifically designed to be used with our Mesh Stencil technology. Our paints are ideal for creating crisp lines and edges when painting with stencils as well as being designed for easy clean up so you can keep using your stencils time and time again! For best results, choose a high-quality paint like the ones offered at A Makers' Studio - even our Gilding Size and Etching Cream can be used with our Mesh Stencils very easily!
Here is a list of all our mediums and what they are used for:
ChalkArt - This is a non-permanent medium that can be used on many surfaces such as paper, wood, ceramic, glass, fabric, and more. It can be wiped off hard surfaces for changeable designs!
Gel Art Ink - This is a permanent medium best for soft surfaces such as paper, apparel, upholstery, and fabrics. It can also be used on wood, metal, and plastic. It needs to be heat set on the soft surfaces.
Ceramic Paint - No baking needed, this paint lays a rich permanent color on ceramic and glass surfaces. Food and oven safe!
One Step Paint - Our most versatile paint which can be used on basically any surface including wood, glass, resin, melamine, Formica, concrete, iron, and stone.
Etching Cream - Create beautiful custom detailing on any glass surface. It actually etches into the glass for a permanent design.
Gilding Size - The glue used with Gold, Silver, and Copper Leaf.
Shop all of the A Makers' Studio mediums here as well a our entire Mesh Stencil collection.
How to Paint With Stencils Without Bleeding: Step-by-Step Guide
Once you have chosen your paint, it’s time to get to work! Here are some tips and tricks from our experts at A Makers' Studio on how to get started:
- Make sure your surface and stencil are completely dry before starting—any moisture will cause the paint to bleed underneath the stencil's edges.
- Place the Mesh Stencil onto your surface and secure it firmly in place by burnishing (rub all over in circles) so there are no gaps or bubbles between the stencil and the surface. Push the stencil very firmly onto the surface around small details especially so all adhesive is properly stuck to the surface. Any sections not properly adhered could possibly bleed. TIP: Add some painter's tape around the edges of your stencil to avoid painting outside the lines and onto the surface where you don't want any paint.
- Use a ChalkArt Spreader, Squeegee, Artist Brush, or Foam Dome Brush dipped in paint and gently smooth over each design, pushing the paint through the mesh, until all areas are filled in properly. Avoid using too much paint as an over abundance of medium will cause bleeding. A minimal amount goes a long way, so start small and add more as needed. Dab or scrape lightly so that the paint goes through the mesh, but you're not forcing too much that could seep underneath the edges of the design. TIP: Work fast to cover your stencil with paint within 5 minutes or the medium will dry in the mesh and ruin the stencil.
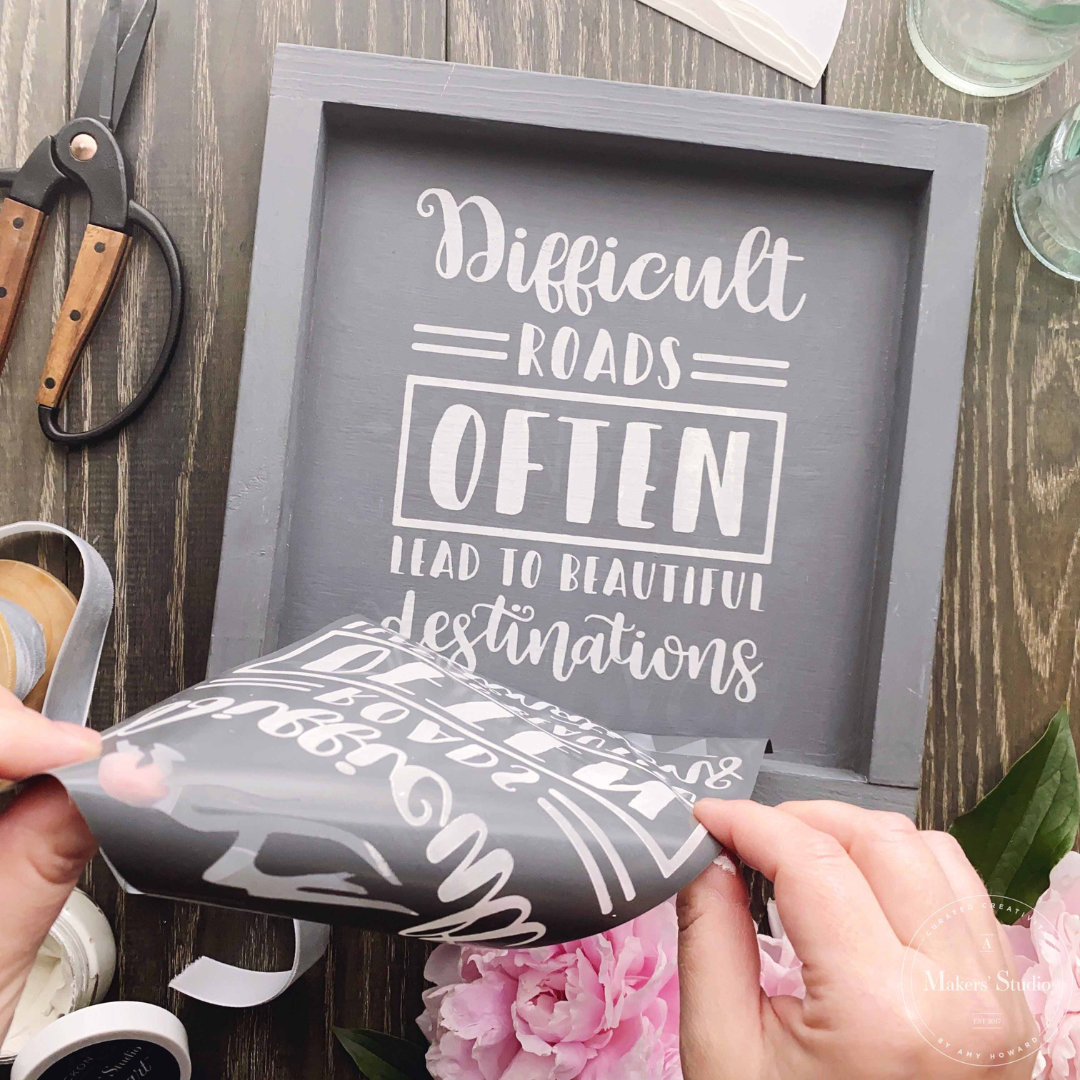
- Now for the best part! Once the design is painted and the paint is still wet, gently pull the Mesh Stencil straight up away from the surface at a 90 degree angle and watch your design come to life!
- Be sure to immediately wash the stencil in warm water, rubbing the non adhesive side in circular motions with your fingertips until the mesh is clear of paint (you may also use a sea wool sponge to gently rub out the paint on the non adhesive side of the stencil). All our mediums are designed to pair with Mesh Stencils, but if the paint is not immediately washed out with your fingertips, you may place it in a warm water bath to loosen any paint. If you are not able to immediately wash the stencil, then you may go ahead and place it in a warm water bath until ready to wash (this is the best way to clean stencils if you're pressed for time or need to finish painting elsewhere).
NOTE: Surfaces such as paper, cardboard, wood, and other smooth surfaces will give a crisper transfer than surfaces such as fabrics, canvas, grainy wood, etc. If you're working with a textured surface, we recommend painting a layer of One Step Paint on the surface before applying the stencil design. This will allow for a smoother surface and cleaner design.


First, Get the Right Stencils at A Makers' Studio
Take a look at some of these most popular themed Mesh Stencils to get started making your very own projects!
Grab Other Necessary Tools & Supplies
Before getting started on your project, make sure you have all the necessary tools and supplies. You’ll need a stencil, paintbrush or Squeegee depending on the size of your project, some painter’s tape (optional), a drop cloth or newspaper (to protect the surface beneath your project) and your chosen paint or medium in colors that match your room’s décor. You may also want to grab some small sponges or q-tips for cleaning up any mistakes along the way.
Prep the Surface Before You Start Painting With Stencils
The key to successful painting with a stencil is preparing your surface properly before starting. Make sure that your surface area is clean and free of any dirt or dust that could interfere with the adhesive on your stencil. Clean Slate is an amazing product that will clean off any grease, dirt, oils, or waxes that you cannot see and that live on the surface.
Do You Pull Stencil Off Wet or Dry?
When it comes time to pull off the stencil after painting with it, you should always pull of when the medium is still wet! The hazard of not working fast enough is that the paint can dry in the mesh of the stencil. Also, after removing the stencil, you may correct any accidental smudged with a q-tip while the paint is still wet.

Additional Tips for Painting With Stencils Like a Pro
When it comes down to actually painting with a stencil there are several tips that can help make sure everything goes smoothly! Always start in an inconspicuous corner when beginning each design element so that if anything goes wrong, no one will see it! Also make sure to use light pressure when applying paint over the edges of each stencil design—this will help ensure that none of the details get smudged or blurred out as you paint! Finally, you may add a protective coat over your design using Matte Sealer. Once your design is fully dried, you may paint a coat over the entire design or surface (use a foam roller gently if applying over ChalkArt). The sealer will dry completely clear and make your design durable to last for years to come! When working with smaller details make sure not too overload your brush with too much paint at once - this can cause bleeding underneath the stencil even if adhered well to your surface. Additionally try dabbing instead of brushing if possible - this helps keep things looking neat around corners and tight spaces!

Painting with stencils can be an incredibly rewarding DIY project if done correctly – but many people struggle with their projects due to issues such as bleeding or smudging around the edges of their designs due to improper techniques or materials used during application. Hopefully these tips will help make your next painting project go smoothly! Just remember: always use high quality materials like those offered at A Makers' Studio, take extra care when applying multiple layers of paint, allow each layer adequate drying time before adding another layer or color, and don’t rush through any step of the process! Good luck!
See why other crafters love our Mesh Stencils and the variety of projects that can be made with them. Join our community on the Crafting a Beautiful Life Facebook page to share project photos, get inspired, and get tips and tricks from fellow crafters.
We can't wait to see how you start Crafting Your Beautiful Life!
Leave a comment