
Are you searching for chalk art ideas to inspire your next DIY project? We have some fun, easy ideas for ChalkArt just waiting to be discovered in this complete guide!
Fun, Easy Chalk Art Ideas for Adults Seeking Inspiration for Their Next DIY Project!
A Makers' Studio ChalkArt is all about versatility. Use this water-based chalk paste to easily customize your furniture, tabletop décor, glass, and nearly any other non-porous surface.
What you'll love:
- After drying for just 15 minutes, you will have a beautiful piece of lettering or artwork that will leave people wondering, "how did she do it?"
- Change up your design later by simply cleaning your piece with a wet rag and creating something brand new!
- Pair with our uniquely detailed (and patented!) mesh decorative stencils to create truly professional designs on almost any surface over and over again!
Join in the fun of customizing weddings and events, hostessing like a pro with beautifully designed placemats, creating magazine-worthy furniture updates, and more with ChalkArt.
What Do You Need for These Fun Chalk Art Ideas?
All you need to create fun projects is a surface and some ChalkArt! The possibilities are endless from Dollar Tree and Target dollar section finds, to old décor you want to spruce up, to blank wooden signs or surfaces.
Check out all the A Makers' Studio surfaces and ChalkArt colors.

Fun, Easy ChalkArt Ideas for Adults: Inspiration For Your Next DIY Project
How To Create An Ombré Sign:
- This easy ChalkArt idea starts with choosing the colors you want to create your ombré effect with - we recommend starting with three and we used the following colors in the picture below: Pretty as a Peach (top color), Yes Ma'am (middle), Curb Side Shopper (bottom).
- Place your Mesh Stencil on the area you want the design
- Start with the lightest color you are using, take some on your ChalkArt Spreader, and begin spreading it through the Mesh Stencil on the area you want to be the start of your ombré
- When you have placed the product on a little over a third of your stencil, it's time for the next color
- Begin spreading your next color into the stencil starting on the outside line of where you want your second color to end, working towards your lightest color. Leave negative space in between your second and first colors.
- Now it's time for your final color, use the same technique by starting in the area of not touching your second color and working towards it. As you get closer to your second color, leave negative space.
- Once your colors are placed, it's time to blend!
- Take a little bit of both colors you are blending on your ChalkArt Spreader, then blend in the negative space you created earlier. Repeat this with your other two colors and until your stencil is completely covered!
- Voila! Enjoy your gorgeous ombré design and Enjoy the Bragging Rights!

Decorate Your Charcuterie Board:
We know that charcuterie boards have taken the world by storm. What better way to enjoy food and fellowship than inviting your friends over and enjoying a meal around this adorable board? ChalkArt is great to decorate with because it is food safe and can be washed off so you can create new designs over and over again! This easy ChalkArt idea is sure to be a hit with your guests.
Shop What She Used:
DIY Message Board:
We love having inspirational décor around our homes. Create your own chalkboard which can be erased and redesigned as often as you want. This idea for ChalkArt is inspiring, simple, and fun! Follow the steps below to learn how it's done.
Supplies:
- Metal Chalkboard Stand
- Mesh Stencil – Do As The Lord
- Dreamy Eyes – ChalkArt
- Can’t Never Could – ChalkArt
- ChalkArt Spreader
Instructions:
- Begin by cutting out your stencil.
- Then place it centered onto your Chalkboard Stand, smoothing out any bubbles.
- Next, use the ChalkArt Spreader to apply Can’t Never Could ChalkArt to all the words except “heartily” on the stencil. Be sure to apply enough pressure to push the ChalkArt through the mesh.
- To prevent the ChalkArt from drying you can carefully lift the stencil up and then back down on either side before continuing to the next color. Be sure not to lift it all the way up or you will lose your placing.
- Laying the stencil back in place, repeat the steps adding Dreamy Eyes ChalkArt to all the details along with “heartily.”
- Once done, remove the stencil and wash in lukewarm water.
Textured Wall Art:
Wall art is about more than filling space or matching your existing decor. It should also be about filling your home (or office) with things that lift you up. That’s why we love this Reminder of Hope wall art project. Using plaster, ChalkArt, and some beautiful stencils, you can create a one-of-a-kind message that reminds you to always keep the faith.

Supplies:
- Square Wooden Frame
- One Step Paint - Stoneware
- Cute As A Button ChalkArt
- Can't Never Could ChalkArt
- Venetian Plaster
- Hope Faith Mesh Stencil
- ChalkArt Spreader (2)
You will also need a small spray bottle, scissors, a bowl, and a spoon.
Instructions:
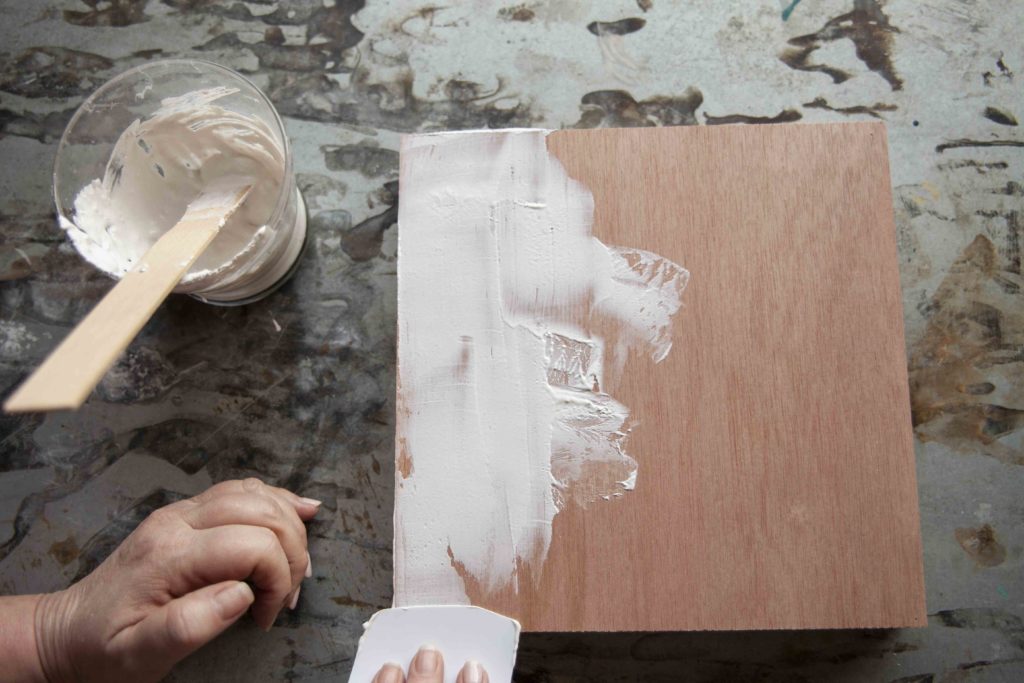
- Mix your plaster with water, using 2 parts plaster to 3 parts water. You want it to be the consistency of thicker sour cream.
- Once your plaster is properly mixed, use your spreader to apply a thin coat of plaster to your surface. Also apply consistently, scraping the excess as you go. Allow it to dry.
- Cut one spreader into 3 parts.
- Spray your dried plaster surface with a little bit of water.
- Using one spreader, apply your Cute As A Button ChalkArt in different sections of your board. The water will make it easier to pull the chalk paint across the plaster, as well as leave an authentic, aged appearance.
- Overlay plaster on the chalk paint, moving your spreader (loaded with the plaster) lightly up and down and from side to side. Continue to add plaster until you only get a small peek-through of the Cute As A Button blue paint.
- Next, lay in Can't Never Could ChalkArt and repeat Steps 5 and 6. Apply this layer only in small, choppy strokes — do not cover the entire surface. This paint will dry very light, but you don’t want a lot of it.
- Using your third spreader, apply the Gathered Rescue Restore paint lightly to your surface. Use this paint layer to blend the gray, blue, and plaster, making sure to apply as thin as possible and to leave negative space (with no Rescue Restore paint).
- Continue to add colors and plaster until you are satisfied.
- Once all the layers of plaster and paint are completely dry, cut the Hope Faith stencil and lay it on your surface in the lower right quadrant. Then, paint the “Hope” text using the Can't Never Could ChalkArt using a clean spreader.
- Remove the stencil, wash it, and lay flat to dry.

How Do You Make Chalk Art Look Good? Tips for Perfecting These Fun Chalk Art Ideas Yourself
ChalkArt is a fun and creative way to add personality and flair to any non-porous surface. Whether you're updating old furniture or creating custom décor, there are some tips and tricks you can use to make your ChalkArt look its best. Here are some tips for perfecting your ChalkArt ideas:
-
Choose the right surface: When it comes to ChalkArt, not all surfaces are created equal. Non-porous surfaces like glass, metal, wood, and plastic work best, as they allow the chalk paste to adhere well and prevent smudging. .
-
Prep the surface: Before applying the chalk paste, make sure the surface is clean and dry. Use a lint free cloth to remove any dirt, dust, or debris from the surface. If the surface is greasy or oily, use the A Makers' Studio Clean Slate to remove any residue.
-
Use the right tools: ChalkArt can be applied using a variety of tools, including ChalkArt Spreaders, brushes, Mesh Stencils, and freehand drawing. Choose the tool that best suits your design and skill level. If you're not confident in your freehand drawing abilities, stencils can be a great way to achieve a more polished look.
-
Practice your technique: If you're new to ChalkArt, it can take some practice to get the hang of it. Try experimenting with different techniques, such as layering colors, shading, and adding texture with the ChalkArt ideas and projects listed above.
-
Seal your work: Once your ChalkArt project is complete, it's important to seal it to protect it from smudging and fading. Use the A Makers' Studio Matte Sealer and a Roller Brush and Cover to keep it looking great for years to come.NOTE: ChalkArt is a non permanent paint if it is not sealed. To erase and redesign, just use a damp rag to wipe the surface clean of the ChalkArt. For your design to be permanent, seal with Matte Sealer.
With these tips and a little creativity, you can create stunning ChalkArt projects that will add personality and style to any space. So grab your supplies and get started!
Get Quality Supplies You Can Count on at A Maker’s Studio
Shop our ChalkArt colors and Mesh Stencils to get started creating your own DIY projects and start Crafting a Beautiful Life.
- ChalkArt Paste
- Adhesive Mesh Stencils
- Animal Stencils
- Bible Verse Stencils
- Holiday Stencils
- Letter Stencils
- Quote Stencils
Want to learn more? Take a look at these related articles for more information about A Makers' Studio products and project ideas:
- How to Use Stencils
- What Are Stencils?
- How to Paint with Stencils
- How to Paint Stencils on Wood
- Best Stencils for Painting
- How to Clean Stencils
- How to Use Letter Stencils with Paint
- How to Make Stencil Art
Want to see the process of cleaning stencils? Watch this short video!
Leave a comment