How to Apply Gel Stain to Wood Evenly (Finished or Unfinished)
Are you looking to revitalize your wooden furniture or décor? Gel Stain can be a game-changer. It's a versatile and easy-to-use product that allows you to achieve stunning results, whether you're working with finished or unfinished wood. In this comprehensive guide, we'll show you how to apply Gel Stain to wood evenly, unlocking a world of possibilities for enhancing the beauty of your wooden surfaces.

Why Learn How to Apply Gel Wood Stain?
Gel Stain is a popular choice among DIY enthusiasts and professionals alike. It offers several advantages over traditional wood stains, making it worth your time to learn how to apply it effectively. Gel Stain is thicker and more forgiving than liquid stains, making it easier to control and reducing the chances of streaks and blotches. It also provides better coverage and allows for more color control, giving you greater flexibility in achieving the desired look for your project.Benefits of Using Gel Stain to Breathe Fresh Life into Wooden Surfaces:
Using gel stain can breathe new life into tired wooden surfaces. Here are some of the key benefits:
1. Enhanced Color: Gel Stain provides rich and vibrant color that enhances the natural beauty of the wood grain.
2. Easy Application: Its thick consistency makes it easy to apply, even for beginners.
3. Reduced Prep Time: Unlike traditional stains, gel stain often requires minimal sanding or stripping, saving you time and effort.
4. Versatility: Gel Stain can be used on a variety of wood surfaces, including furniture, cabinets, doors, and trim.
5. Long-lasting Finish: Gel Stain offers excellent durability and protection, ensuring your wood surfaces stay beautiful for years to come.
The Versatility of Gel Stain Applications:
Gel stain can be used to achieve a variety of finishes and effects. From traditional wood tones to bold and contemporary colors, Gel Stain can help you achieve the look you desire. It can mimic the appearance of different wood species, allowing you to transform inexpensive wood into a high-end look. You can also use Gel Stain to create unique effects such as distressed or antique finishes, giving your projects a one-of-a-kind appeal.
Take a look at the A Makers' Studio collection of Gel Stains here, choose your color, and start Crafting Your Beautiful Life!


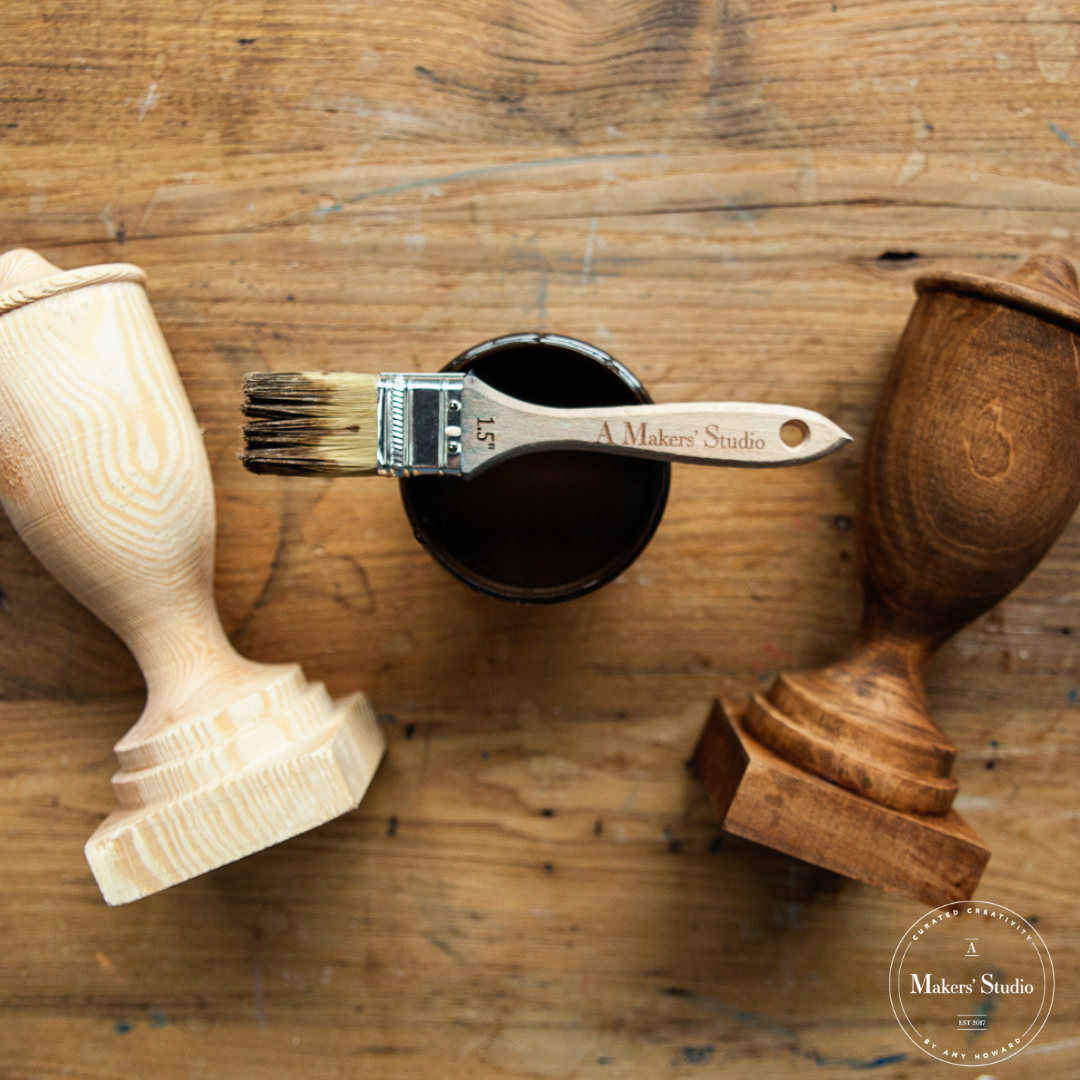
How to Apply Gel Stain to Wood:
Now that you understand the benefits and versatility of Gel Stain, let's dive into the step-by-step process of applying it to wood surfaces.
1. Preparation: Start by ensuring your wood surface is clean, dry, and free from any existing finish or debris. If needed, sand the surface lightly to promote better adhesion.
2. Stir and Test: Thoroughly stir the Gel Stain to ensure an even color consistency. Before applying it to your project, test the stain on a small, inconspicuous area to ensure it achieves the desired color.
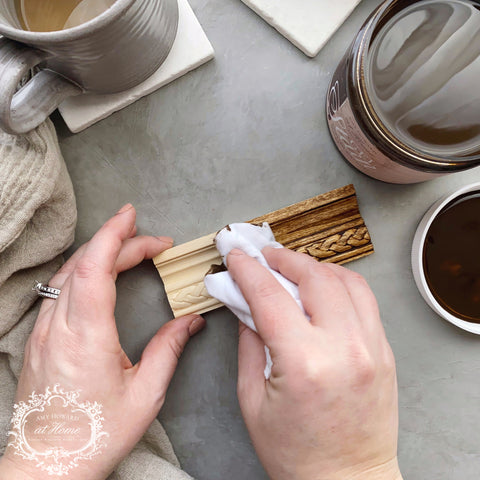
3. Application: Using a brush, cloth, or sponge applicator, apply a thin and even layer of Gel Stain in the direction of the wood grain. Work in small sections to prevent the stain from drying before you can blend it. Allow the stain to penetrate the wood and sit for a longer amount of time if you'd like the stain to present a darker color. Wipe the stain shortly after application if you'd like the stain to present a slightly lighter color.
4. Blending and Wiping: After the recommended penetration time, use a clean cloth or rag (we recommend using lint free rags like t-shirt material) to wipe away any excess stain, blending the color evenly. Be sure to follow the instructions provided on the container for the best results.
5. Drying and Curing: Allow the Gel Stain to dry completely according to the instructions. It's essential to provide ample drying time to ensure a durable finish. Once dry, the stain will need time to cure fully, so avoid placing objects on the stained surface for a few days.

General Tips for Applying Gel Stain to Wood:
Here are some additional tips to help you achieve the best results when working with Gel Stain:
1. Work in a well-ventilated area to ensure proper air circulation and avoid inhaling fumes.
2. Protect your work area with drop cloths or newspapers to prevent staining or damage to surrounding surfaces.
3. Use gloves to protect your hands and consider wearing a mask for added protection.
4. Always follow the instructions and recommendations for the specific Gel Stain product you are using.
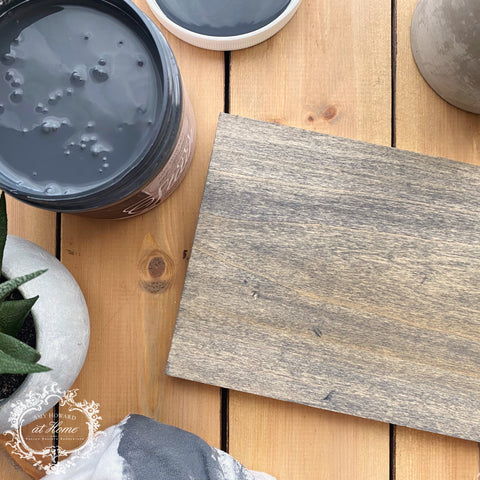
How to Apply Gel Stain to Unfinished Wood Specifically:
Unfinished wood surfaces provide an excellent canvas for Gel Stain. The process is similar to the general application steps mentioned earlier. However, since unfinished wood tends to absorb more stain, you may need to apply multiple coats to achieve the desired depth of color. Allow each coat to dry completely before applying the next one.
How to Apply Gel Stain to Finished Wood Specifically:
Applying Gel Stain to finished wood requires some additional preparation. Start by cleaning the surface to remove any dirt, wax, or oils. Lightly sand the finish to create a better bond for the Gel Stain. Follow the general application steps, ensuring even coverage. If desired, you can also use a bonding agent specifically designed for Gel Stain and finished surfaces to promote better adhesion.
Putting the Finishing Touches on Your Project:
Once the Gel Stain is dry and cured, you may consider adding additional decorative accents to elevate your project further. Stencils and paint can be excellent tools for creating unique designs on your stained wood surface. Consider using Mesh Stencils to add patterns, quotes, or even Bible verses to create a personalized touch. You can find a wide variety of Mesh Stencils suitable for different themes, holidays, and styles here at A Makers' Studio.
- Bible Verse Stencils
- Quote Stencils
- Holiday Stencils
- Pattern Stencils
- Animal Stencils
- Letter Stencils

Restoring Hardware and Other Accents for a Complete Makeover:
To complete your Gel Stain project, don't forget to restore any hardware or accents. Remove and clean existing hardware, such as knobs or hinges, and consider giving them a fresh coat of paint or finish to match your newly stained wood. Additionally, explore other accents like Decorative Silicone Molds, Chalk Paste, or Gel Art Ink that can add texture and interest to your project.
Closing Thoughts on How to Apply Gel Stain to Wood:
Learning how to apply gel stain opens up a world of possibilities for transforming your wooden furniture or décor. Whether you're working with finished or unfinished wood, the application process is straightforward and can yield remarkable results. Gel Stain provides durability, vibrant color, and versatility, allowing you to express your creativity and enhance the natural beauty of wood. So why wait? Start your Gel Stain journey today and unlock the potential of your wooden surfaces!
Explore our collection of reusable Mesh Stencils, Decorative Silicone Molds, Chalk Paste, and Gel Art Ink to take your Gel Stain projects to the next level.
Related articles:
Leave a comment