Inside A Makers' Studio
Inside A Makers' Studio
Create Beautiful DIY Christmas Ornaments with Eco Powder
If you’re looking to add a touch of handmade charm to your holiday gifts and décor, look no further!
In this fun and festive workshop, Amy Howard walks you through creating stunning DIY eco powder Christmas ornaments using the Holiday Maker Box—a treasure trove of creative supplies perfect for the season.
The best part? The Holiday Maker Box is on BOGO (Buy One, Get One FREE!), so you can treat yourself and a friend to creative fun this winter!
What is the Holiday Maker Box?
The Holiday Maker Box includes 8 unique projects that let you create everything from Christmas ornaments to decorative tags and ribbons.
Inside the Holiday Maker Box, you’ll find:
- Eco Powder
- Silicone Ornament Molds
- Custom Holiday Stencils (exclusive to the box!)
- Gel Art Ink (Red, Green, Gold, Black, and Blue)
- Spreaders and Brushes
- Gold Paint Pen
- Satin Ribbon
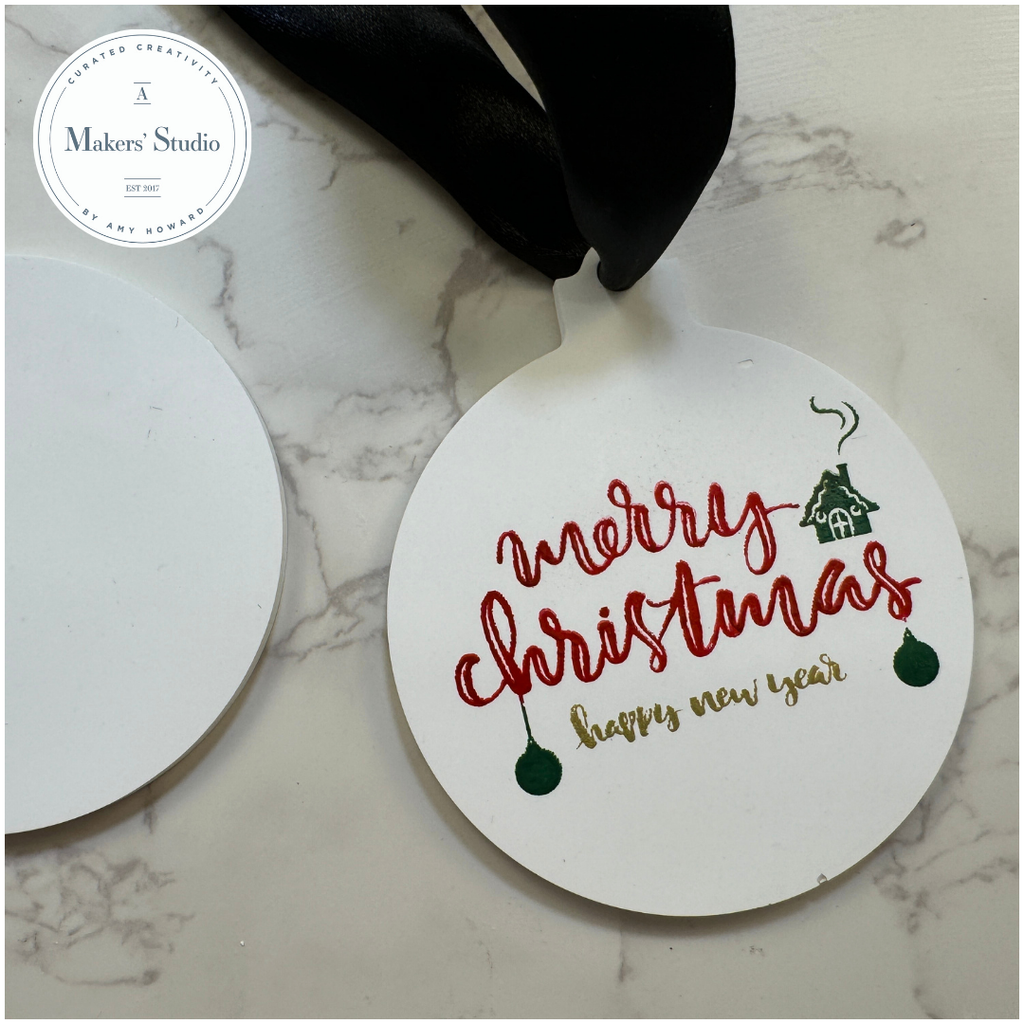
How to Make DIY Eco Powder Christmas Ornaments
Follow along as Amy shows you step-by-step how to create beautiful ornaments using eco powder and the included stencils. These handmade treasures are perfect for gift tags, tree decorations, or even keepsakes for the holiday season.
Materials You’ll Need:
- Eco Powder (included in the box)
- Silicone Mold
- Water
- Spreaders
- Custom Stencils
- Gel Art Ink (choose your favorite colors)
- Satin Ribbon
- Gold Paint Pen
Step-by-Step Instructions:
- Mix the Eco Powder: Combine 3 parts Eco Powder to 1 part water to achieve the perfect consistency (similar to pancake batter).
- Pour into the Mold: Use the included silicone mold and carefully pour the mixture in, ensuring it fills the space evenly. Let it set for about 15–20 minutes before handling.
- Demold Your Ornament: Gently pull the edges of the mold to release the ornament. The self-leveling finish creates a professional, ceramic look!
- Decorate Your Ornament: Use the exclusive stencils and gel art inks to customize your ornament with festive designs.
- Add Finishing Touches: Write a “To/From” message or date using the gold paint pen and tie a ribbon through the top.
Why You’ll Love This DIY Project:
- Versatile Design: Perfect for Christmas, Valentine’s Day, Mother’s Day, and more!
- Affordable Crafting: Each project comes to just $5 with the BOGO deal.
- Handmade Keepsakes: Thoughtful, personalized gifts for loved ones.
-
Relaxing and Creative: Slow down, enjoy holiday music, and craft beautiful keepsakes.
The Holiday Maker Box is available Buy One, Get One FREE for a limited time. It’s the perfect opportunity to create and share the gift of creativity with someone you love. Supplies are limited, so don’t miss out!
Happy crafting, and may your holidays be filled with creativity, joy, and meaningful moments!
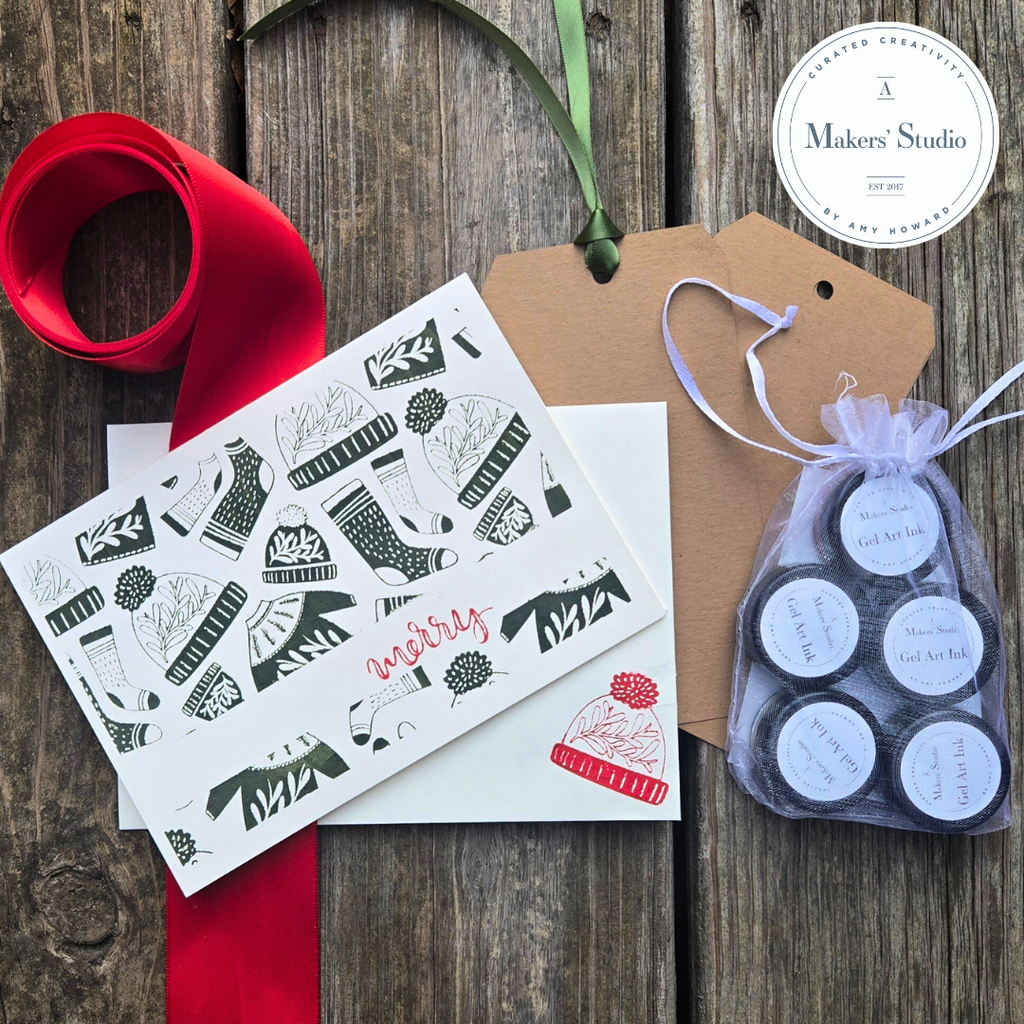
Create Charming DIY Christmas Stationery
It’s Sweater Weather and Craft Time!
Get cozy and join Tamara from Kansas City as she walks you through creating delightful DIY Christmas stationery using the Holiday Maker Box.
Whether it’s cold and snowy or just a festive time of year, this project will add a warm, personal touch to your holiday season. Perfect for cards, gift tags, and more, Tamara shares tips, tricks, and her love for crafting in this step-by-step tutorial.
What You’ll Learn in This Project
- How to design custom holiday cards and matching envelopes.
- Tips for layering stencils and creating negative space for unique designs.
- Techniques to mix colors for custom shades using gel art inks.
- Creative ways to turn your stationery into gifts or festive decor.
Materials Used
This project features the Holiday Maker Box, which includes:
- Stencils: "Holiday Outfits" and "Sweater Weather" (exclusive to the box).
- Gel Art Inks: A versatile palette of red, green, gold, black, and blue.
- Heavy Cardstock: Perfect for creating cards and envelopes.
- Spreaders: For applying ink evenly across stencils.
- Red Satin Ribbon: To add a touch of elegance to your projects.
- Gold Paint Pen: Ideal for adding delicate details or outlines.
You’ll also need a few additional crafting staples:
- Washi Tape: To create clean lines and protect areas while stenciling.
- Scissors: For trimming and cutting shapes.
- Toothpicks: Great for touching up fine details.
- Craft Paper: For wrapping and additional decorative touches.
Step-by-Step Instructions
- Set Up Your Workspace: Start by gathering your supplies from the Holiday Maker Box. Use washi tape to secure your stencil onto the cardstock and create negative space for your design.
- Mix and Match Colors: Use the gel art inks to create custom colors. Tamara mixed green and black for a rich shade and used blue to evoke a Scandinavian winter vibe.
- Stencil Your Design: Apply the gel art ink with the spreader, ensuring even coverage. Pull the stencil away gently to reveal your pattern, and let the ink dry.
- Add Text and Details: Use the "Merry Christmas" stencil to add festive text to your cards. Tape off unwanted parts of the stencil to ensure clean lettering.
- Create Matching Envelopes: Decorate envelopes to coordinate with your cards. Use smaller stencil designs like hats or sweaters to add playful details.
- Personalize and Assemble: Attach satin ribbon to your cards for a polished look. Consider cutting out stencil designs to create 3D embellishments or garlands for an extra special touch.
- Wrap it Up: Use craft paper to create matching wrapping for your gifts, or add custom designs to ribbon and tags.
Crafting Tips from Tamara
- Experiment with Color: Mix gel art inks to create custom shades and match your holiday theme.
- Layer Your Designs: Stencil different patterns and words to add depth and interest to your creations.
- Enjoy the Process: Don’t stress about perfection—creativity thrives when you’re in a state of play!
Why You’ll Love the Holiday Maker Box
The Holiday Maker Box is packed with everything you need to create unique holiday crafts. These high-quality materials and exclusive stencils make it easy to craft personalized stationery, gifts, and more. Plus, every project is designed to spark joy and creativity during the festive season.
Get Started Today!
Don’t miss out on the opportunity to craft beautiful memories with the Holiday Maker Box. Whether you’re creating for loved ones or adding a handmade touch to your celebrations, this kit has everything you need.
Let the spirit of the season inspire your creativity and make this year’s celebrations truly magical.
Happy crafting!
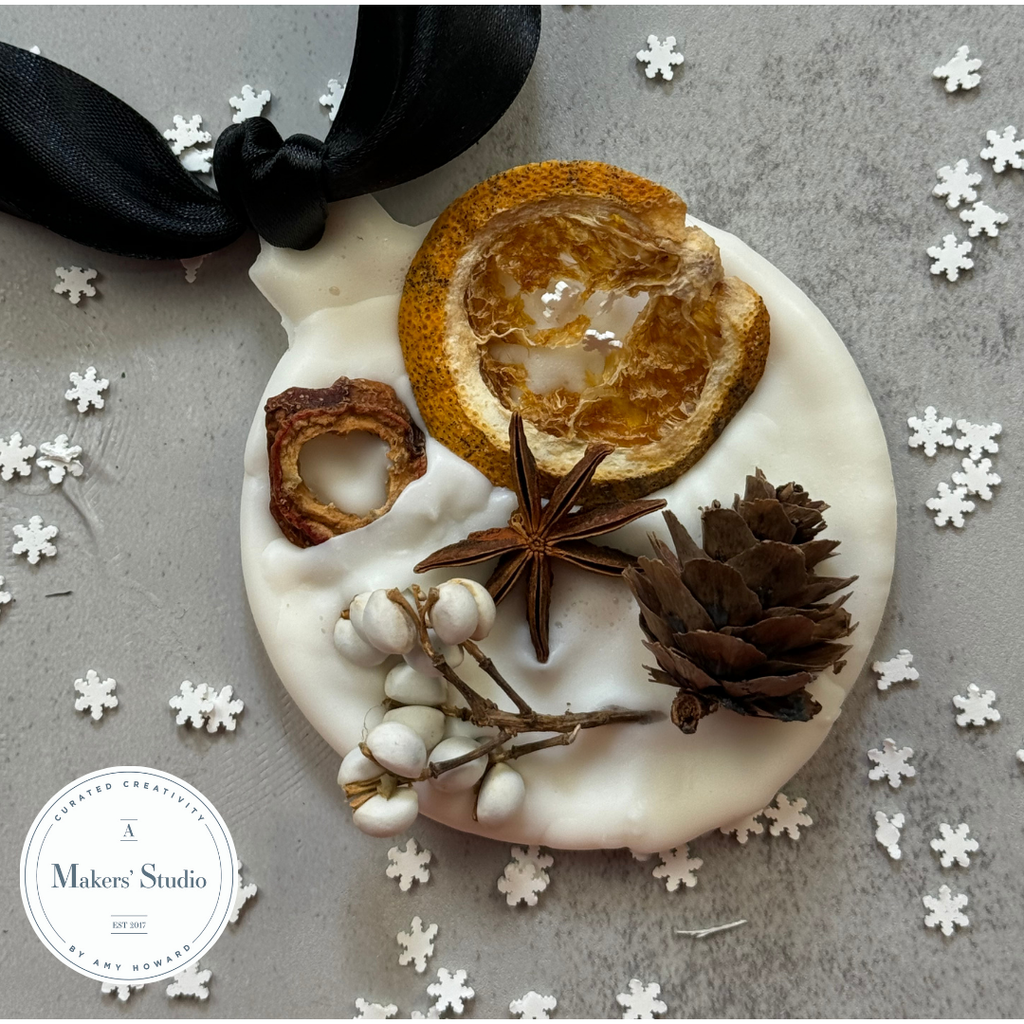
Craft Stunning Wax Ornaments for the Holidays
Welcome to another inspiring Maker Monday!
This week, Amy Howard takes us through one of her favorite holiday projects—creating elegant wax ornaments. These ornaments are a perfect blend of simplicity and sophistication, making them ideal for holiday décor or as a thoughtful, handmade gift.
Whether you’re adorning your Christmas tree, wrapping gifts with an extra-special touch, or creating memories with loved ones, this project is a must-try!
Why You'll Love Wax Ornaments
- Elegant and Classic: These ornaments exude an upscale charm while being easy to make.
- Multi-Purpose: Use them as tree decorations, gift embellishments, or room fresheners by adding essential oils.
- Perfect for All Ages: A great project to share with family and friends during the holiday season.
What You’ll Need
The materials you need to create your wax ornaments are all included in the Holiday Maker Box:
- Natural Beeswax
- White Pigment Powder
- Ornament Mold
- Dried Elements: Oranges, star anise, and pinecones
- Satin Ribbon
Optional add-ons:
- Essential Oils (like cinnamon or orange for a festive aroma)
Step-by-Step Instructions
- Melt the Wax: Set up a double boiler or use a microwave-safe measuring cup to melt your beeswax. For precise results, we recommend using about 2 cups of wax per project.
- Add Pigment Powder: Mix in the white pigment powder to give the ornaments a frosty, snow-like appearance. A teaspoon of pigment is typically enough for small molds. Stir thoroughly until the pigment is evenly distributed.
- Let the Wax Cool Slightly: Allow the melted wax to cool for a couple of minutes. This helps it set up faster when poured into the mold and prevents a transparent finish.
- Pour the Wax into the Mold: Slowly pour the wax into the mold. Pay close attention to small details at the top of the ornament and use a pipette to fill any gaps.
- Add Dried Elements: Once the wax begins to set (around 2–3 minutes), gently press in dried oranges, star anise, and pinecones to create a stunning, layered design.
- Let the Ornaments Harden: Let the wax ornaments sit for about 45 minutes to an hour. For quicker results, you can place the mold in the freezer.
- Demold the Ornaments: Carefully pop the ornaments out of the mold. If needed, let them cure overnight for optimal durability.
- Add Ribbon: Thread a piece of satin ribbon through the pre-formed hole in the ornament. Use the ribbon to hang the ornament on your tree or tie it to a gift.
Tips for Success
- Layered Wax: For a thicker ornament, allow the wax to partially set before adding more layers.
- Use Essential Oils: Add a few drops of essential oil to the melted wax for a delightful scent.
- Customization: Experiment with green pigment powder (included in the Maker Box) for a more festive look.
Why the Holiday Maker Box?
This wax ornament project is just one of the eight festive crafts included in the Holiday Maker Box. With everything you need—stencils, eco powder, Christmas tree candle molds, and more—you’ll have endless opportunities to create gifts and décor that are as unique as you are.
Order Your Holiday Maker Box Today!
Don’t miss your chance to bring handmade elegance into your holiday celebrations. Get your Holiday Maker Box and start crafting beautiful memories this season.

How to Create Adorable Holiday Crafts with the Merry Christmas Mold Set
The holidays are here, and it’s time to deck the halls with handmade creations that add a personal touch to your festive season.
At A Maker’s Studio, we’re thrilled to launch our brand-new Merry Christmas Mold Set, the perfect crafting tool for creating adorable holiday candles, soaps, and even edible delights!
What’s Included in the Merry Christmas Mold Set?
- Gingerbread Man Mold (3"x2.5"x1")
- Christmas Tree Mold (3"x2.5"x1")
- Reindeer Mold (3.25"x2.5"x1")
- Frosty the Snowman Mold (3.25"x2.25"x1")
Why You’ll Love the Merry Christmas Mold Set
The versatility of this mold set is unmatched! Whether you’re creating festive candles with scented wax, charming soaps for holiday gifts, or even baking gingerbread cakes for your dessert table, the possibilities are endless. The high-quality silicone ensures detailed designs every time, and the molds are food-safe, making them perfect for edible projects too!
Imagine giving handmade gifts this year—your friends and family will love the thoughtfulness behind every creation.
Step-By-Step Crafting with Amy Howard
During our recent live workshop, Amy Howard demonstrated just how easy it is to use the Merry Christmas Mold Set. Here are some highlights to get inspired:
- Candles: Create beautiful wax candles using the molds. Add essential oils like cinnamon or vanilla for a festive aroma, and use natural pigments to color the wax.
- Soaps: Make luxurious soaps in fun holiday shapes. Perfect for adding charm to your guest bathroom or as gifts for loved ones.
- Edibles: Bake gingerbread cakes or other treats using the molds. Sprinkle with powdered sugar for a magical touch!
Amy also shared tips for packaging your creations in decorative boxes for gifting or displaying them in a charming holiday village scene. The best part? The molds are reusable, so you can start a new holiday tradition of crafting with your family.
Special Launch Discount: 20% Off!
For a limited time, use the code NEWMOLDS20 at checkout to receive 20% off the Merry Christmas Mold Set, as well as our selection of essential oils and pigment powders. At just $18.99 for the entire set, this is the perfect time to grab a set for yourself and another for a crafty friend.
Get Creative This Holiday Season
Crafting with the Merry Christmas Mold Set is a fun and rewarding activity for all skill levels. Whether you’re decorating your home, making heartfelt gifts, or starting a new family tradition, this mold set is your gateway to a memorable holiday season.
Don’t wait—these molds are available now, and supplies are limited! Grab your set today and let your creativity shine this Christmas.
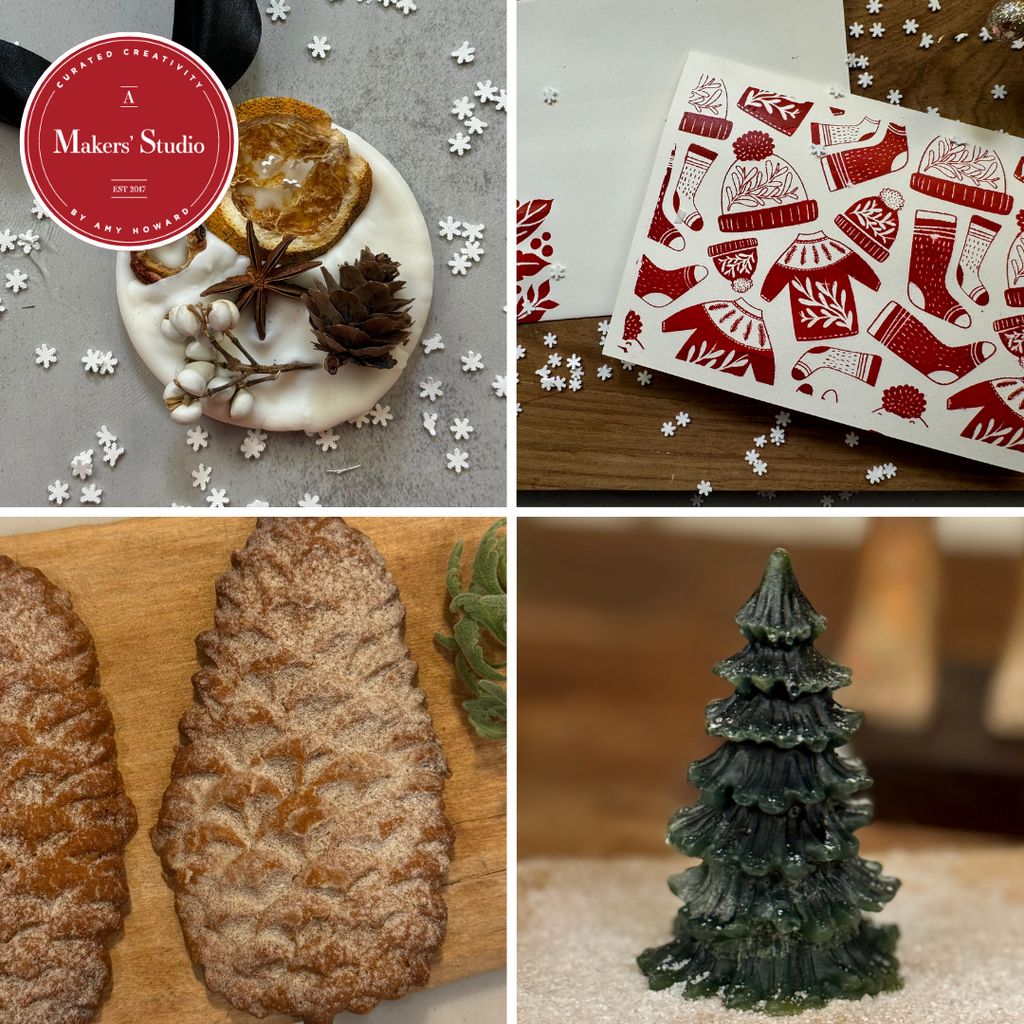
Unveiling the 2024 Holiday Maker Box
The most magical time of the year just got even more creative! We're thrilled to announce the launch of our 2024 Holiday Maker Box, packed with eight exclusive holiday crafting projects designed to fill your home and heart with festive joy.
Whether you're creating for yourself or crafting thoughtful gifts, this all-in-one kit makes holiday DIY effortless and fun for crafters of all skill levels.
What's Inside the Box?
The 2024 Holiday Maker Box includes everything you need to complete eight holiday-themed projects. From wax ornaments to custom ribbons, every project has been carefully curated to deliver a high-quality crafting experience. Here’s what you’ll get:
- Festive Wax Ornaments: Create artisanal beeswax ornaments with dried fruits for a natural and elegant touch to your tree or wreaths.
- Textured Holiday Ornaments: Design stunning, eco-friendly ornaments with stencils and vibrant inks.
- Elegant Coaster Set: Transform plain coasters into festive, handmade table accents.
- Handcrafted Gift Tags: Add a personal, stylish touch to your holiday presents with custom-designed gift tags.
- Vintage-Inspired Cookie Mold: Bake beautiful, embossed cookies with a wooden mold and included recipe.
- Holiday Tree Candle: Craft charming Christmas tree-shaped candles to light up your holiday decor.
- Custom Hand-Stamped Ribbon: Elevate your gift wrapping with bespoke stamped ribbon.
- Festive Stationery Set: Design heartfelt cards and envelopes to spread holiday cheer.
Why You'll Love It
Each project comes with step-by-step recipe cards, making it easy to create stunning results. This box is not only a perfect gift for a creative loved one but also a wonderful way to make lasting memories with family or friends during the holidays.
You’ll also get exclusive stencils only available in this Maker Box, along with high-quality materials like gel art inks, eco powder, dried fruits, wax, molds, and more.
Crafting Made Easy
We’ve done all the hard work, so you can focus on the fun! Each project has been carefully photographed and documented with detailed instructions, ensuring success for beginners and seasoned crafters alike.
The Holiday Maker Box sells out every year—don’t miss your chance to own this year’s most creative holiday kit. At just $11 per project, this all-in-one crafting kit is an incredible value.
Make this holiday season the most creative yet with the 2024 Holiday Maker Box—your ultimate crafting companion! 🎄
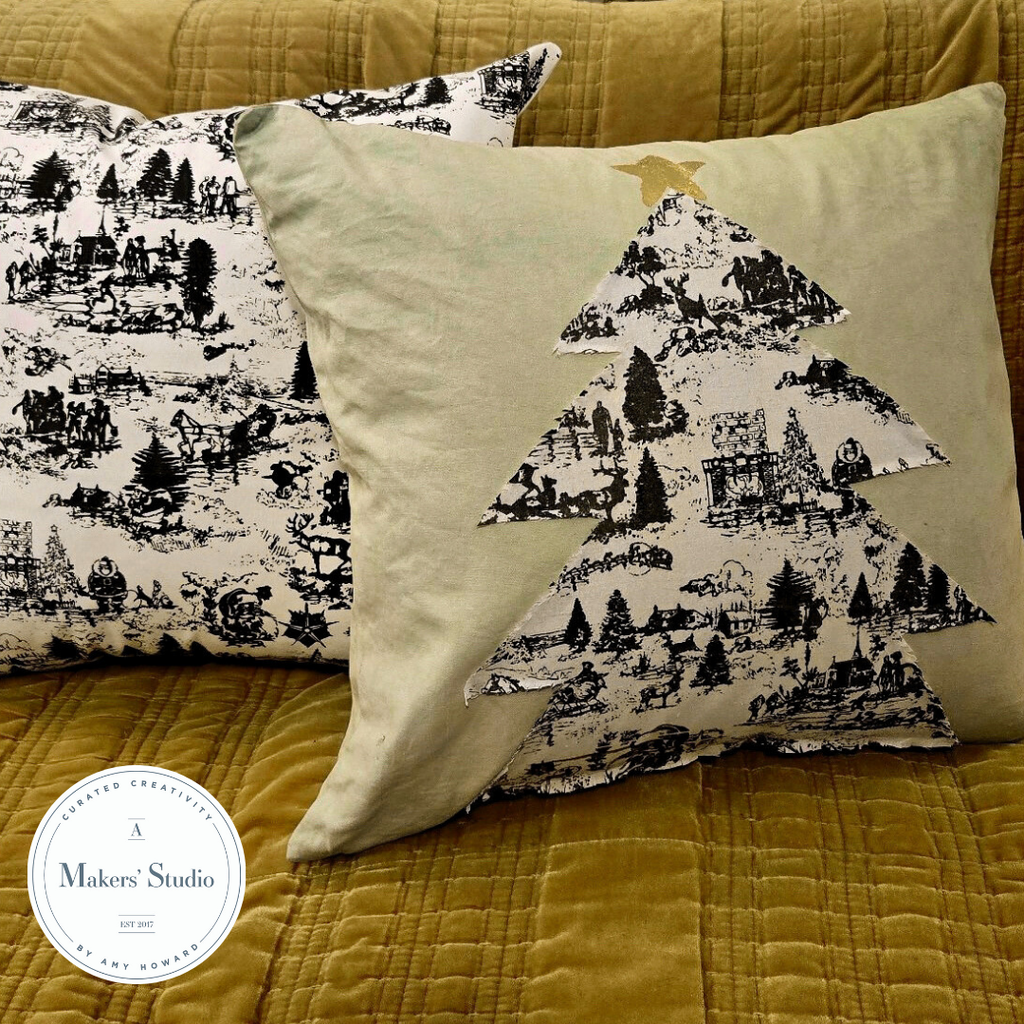
Create Stunning DIY Christmas Toile Pillow Covers
Embrace the holiday season with a touch of timeless elegance through DIY Christmas Toile Pillow Covers.
In this festive workshop, Tamara demonstrates how to use stencils, fabric dyeing, and gold leafing to craft beautiful decorative pillows.
Perfect for adding a cozy, personalized touch to your home or as a unique gift, this tutorial will guide you through each step to create your very own Christmas Toile masterpiece.
So, gather your materials and get ready to craft a beautiful life!
Materials Needed:
- Stencil: Christmas Toile Stencil from A Makers' Studio
- Fabric Dye: English Boxwood One Step Paint (or your choice of green)
- Pillowcase: 18” x 18” pillowcase (gift with purchase option available from A Makers’ Studio)
- Gold Leaf & Adhesive: Gold Leaf and Gilding Size adhesive
- Gel Ink Colors: Grass Is Always Greener and Well, I Swanee (for mixing custom greens)
- Muslin Fabric: For the Christmas tree cutout
- Clear Wax & Mica Powder: Optional for a soft sheen
- Basic Tools: Mixing bowls, paint brush, painter’s tape, cardboard (for backing), chip brush, scissors
Step-By-Step Instructions
Step 1: Dyeing the Pillowcase
- Prepare Dye Bath: Fill a large bowl with warm water and add a generous amount of English Boxwood One Step Paint. Mix thoroughly to ensure an even dye.
- Dye the Pillowcase: Submerge the white pillowcase in the dye bath. Continuously agitate it to prevent paint from settling and creating uneven spots. Leave the pillowcase in the dye for no more than a minute.
- Rinse and Dry: Rinse out the pillowcase and wring it thoroughly. Hang it up to dry completely before moving to the next steps.
Step 2: Stenciling the Christmas Tree on Muslin Fabric
- Prepare Stencil and Ink: Mix Grass Is Always Greener and Well, I Swanee gel inks to create a custom dark green shade. Place cardboard beneath the muslin fabric to prevent bleed-through.
- Position the Stencil: Position the Christmas Toile stencil on the muslin and secure it with painter’s tape. Using a spreader or paint brush, apply the ink by pushing it through the stencil.
- Lift the Stencil: Carefully lift the stencil to reveal the crisp design. Set aside to dry completely.
Step 3: Applying Wax for a Soft Finish (Optional)
- Mix Clear Wax and Mica Powder: Combine clear wax with mica powder (or gold dust) to add a slight sheen.
- Apply Wax: Using a chip brush, lightly apply the wax mixture over the stenciled muslin fabric. This will soften the look and add a subtle shimmer to the design. Let it dry before handling.
Step 4: Cutting Out and Attaching the Tree Design
- Cut the Tree Shape: Create a tree shape pattern on paper, fold it in half, and trace it onto the muslin fabric. Cut out the tree shape.
- Apply Fabric Glue: Use fabric glue to adhere the tree to the pillowcase, leaving a small border around the edges for a fringed effect.
- Fringe the Edges: Once the glue has dried, gently pull threads along the edge of the tree to create a frayed, rustic look.
Step 5: Adding Gold Leaf Accents
- Apply Gilding Size: Use a small brush to apply gilding size (adhesive) to areas where you want to add gold leaf, such as on small "bulbs" or the star atop the tree.
- Wait for Tackiness: Allow the gilding size to become tacky (not fully dry but no longer wet).
- Apply Gold Leaf: Place the gold leaf over the tacky areas, press gently, and then remove the excess leaf with a brush to reveal beautiful gold accents. Repeat as desired for additional sparkle.
Tips for Success:
- Mix Custom Ink Colors: Tamara recommends mixing gel inks to create custom colors, giving you even more creative freedom.
- Layer and Overlap Stencils: For a seamless look on larger fabric areas, slightly overlap the stencil sections rather than aligning them perfectly. This helps avoid any noticeable lines or gaps in the design.
- Preserve Your Stencils: After using the stencil, wash it promptly with warm water to maintain its quality for future projects.
Final Thoughts
Creating a DIY Christmas Toile Pillow Cover with stenciling, fabric dyeing, and gold leafing adds a touch of artistry to your holiday décor.
This project is perfect for a cozy holiday afternoon, and the results are truly one-of-a-kind. Whether decorating your own home or crafting a heartfelt gift, this project will bring joy and elegance to any space.
Ready to get started? Grab your materials and make something beautiful this holiday season! Share your creations and join the community of makers crafting their own beautiful lives.
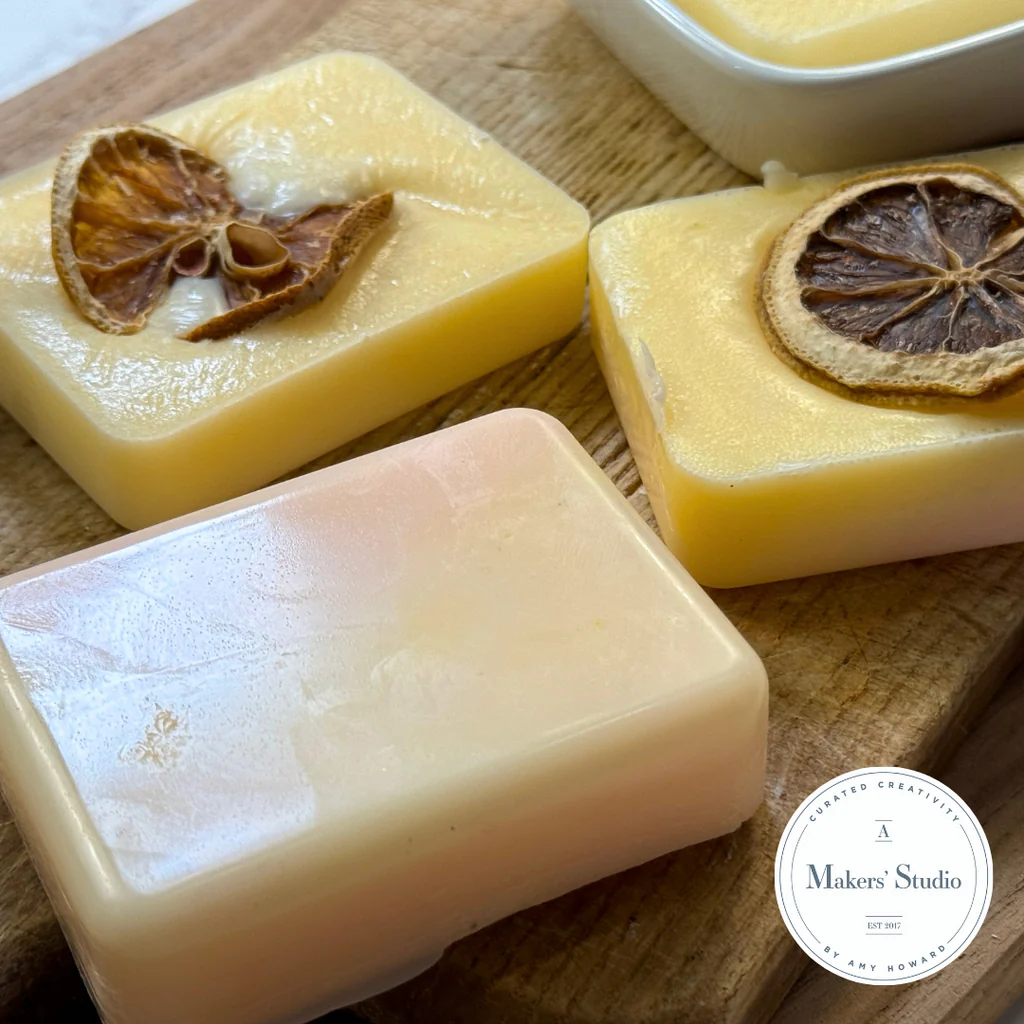
Discover the Art of Soap Making with Our Ultimate DIY Soap Crafting Kit!
Looking for a fun, creative way to make meaningful gifts or indulge in some self-care?
Our Ultimate DIY Soap Crafting Kit is here to transform soap-making into a delightful art form!
In this workshop, Amy Howard from A Makers' Studio takes you step-by-step through the basics of soap crafting, sharing tips, techniques, and inspiration for creating unique, handcrafted soaps. With everything you need included in the kit, this is the perfect activity for holiday gifting, family fun, or pampering yourself.
Why Soap Making?
Making your own soap is not only fun but also rewarding. Whether you want to surprise your loved ones with handmade gifts, engage in a relaxing hobby, or enjoy beautiful soaps at home, this kit is perfect for beginners and seasoned crafters alike. Amy’s workshop makes it easy, and the kit has all the essentials to get you started.
What’s Inside the Ultimate Soap Crafting Kit?
Our kit is packed with everything you need to start crafting your own soaps from scratch. Here's what you'll find:
- Silicone Loaf Mold with Wooden Frame – This sturdy, reusable mold holds your soap mixture in place, allowing you to create beautifully shaped loaf-style soaps.
- Shea Butter and Transparent Soap Bases – Two large blocks each of white shea butter soap and transparent soap, offering flexibility in color and style.
- Organic Essential Oils – Six luxurious, organic essential oils (vanilla, clove, lavender, grapefruit, jasmine, and orange) to create your favorite scents.
- Color Pigments – Six vibrant soap-safe colors (red, yellow, green, blue, orange, and purple) that allow you to mix and customize your soaps.
- Dried Rose Petals and Lavender – Add a touch of elegance to your soaps with dried botanicals.
- Stir Sticks and Measuring Cup – Everything you need to measure and mix your ingredients precisely.
- Soap Cutters – A ridged cutter and a straight-edge cutter for making clean, professional-looking cuts on your finished soaps.
- Small Round and Rectangle Molds – Create individual bars with these additional molds for a variety of shapes.
- Custom Soap Bands – Add a personal touch with these “Made Especially for You” bands, perfect for gifting.
Workshop Highlights:
In the video, Amy demonstrates how to use the kit to make stunning soaps in different styles, including:
- Candy Cane Soaps – Perfect for the holiday season, these red and white soaps combine the transparent and shea butter bases for a festive look.
- Botanical Spa Soaps – Infused with essential oils and topped with dried flowers, these elegant soaps bring a touch of luxury to your bath routine.
- Layered and Swirled Soaps – With two-tone and swirl techniques, Amy shows how to create visually striking soaps by layering colors and textures.
Why You’ll Love It:
Our Ultimate Soap Crafting Kit is designed to make soap-making accessible and enjoyable for everyone. Here’s why you’ll fall in love with it:
- All-Inclusive – No need to shop around; this kit has everything you need to make beautiful soaps.
- Easy to Use – Perfect for beginners and pros alike, with detailed instructions included.
- Fun and Creative – Mix colors, fragrances, and botanicals to create your unique soap designs.
- Great for Gifting – Handmade soaps make thoughtful gifts that show your love and creativity.
Limited Availability:
This kit is in high demand, especially during our Early Black Friday Sale, where you can save 25% on purchases over $150 and get our exclusive "Maker's Guide" as a free gift.
This guide, written by Amy, is perfect for creatives looking to turn their passion into a business.
Don’t miss out – stock is limited, so order your kit today!
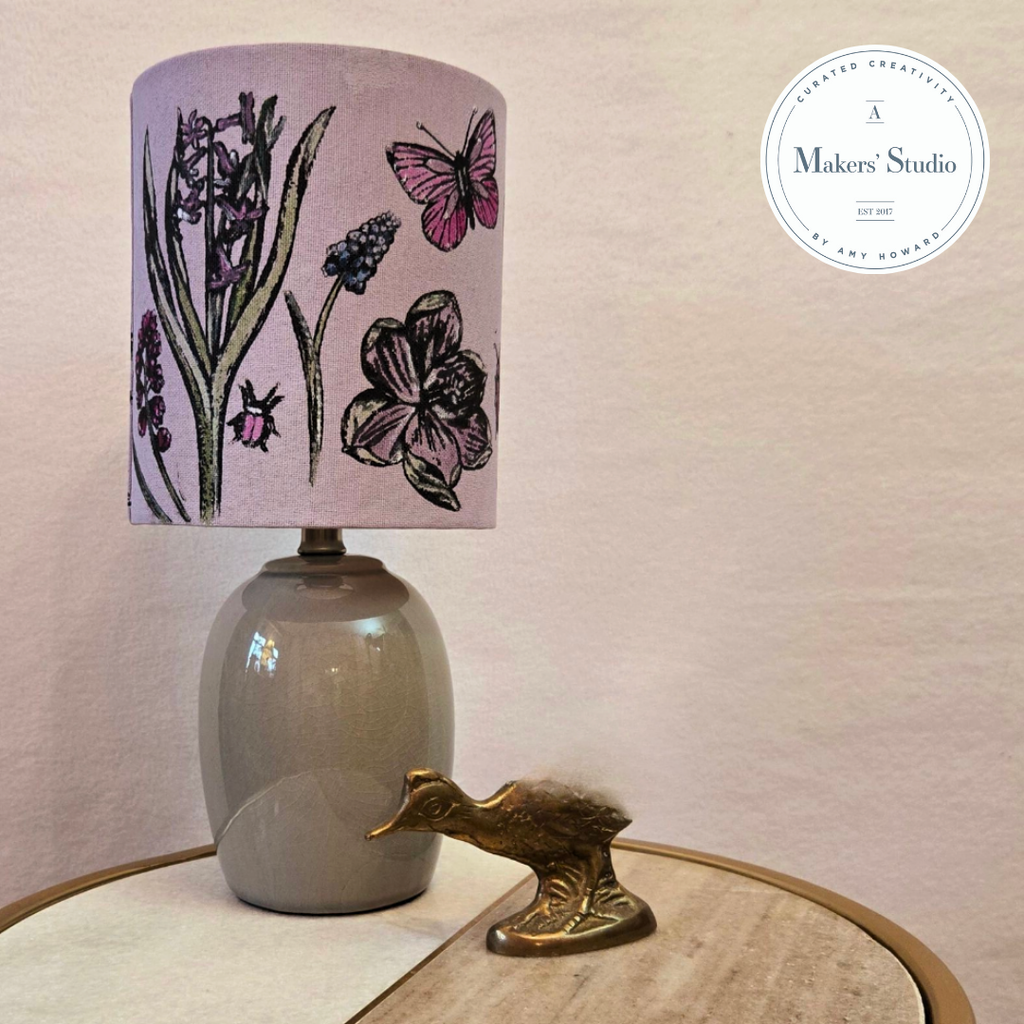
How to Transform a Lampshade with Paint & Mesh Stencils
In this blog post, we’ll take you through a beautiful DIY project where Tamara Encore Hudson shows us how to create a custom, hand-painted lampshade that rivals designer looks—all at a fraction of the cost!
Inspired by high-end styles, Tamara shares her secrets to transforming a basic lampshade into a one-of-a-kind home decor piece with A Makers' Studio’s One Step Paint and Gel Art Inks.
Whether you’re looking to refresh your decor or add a personal touch to a room, this guide will show you how to create stunning, hand-painted designs on fabric lampshades. Ready to get started?
Materials Needed:
- Avery One Step Paint (or any preferred color from A Makers' Studio)
- Gel Art Inks in colors: Can't Never Could (black), Grass Is Always Greener (green), Bless His Heart (pink), Hush Your Mouth (blue), and Well, I Declare (white)
- Vintage Florals and Running Bunnies Mesh Stencils
- Fine Spray Bottle (for water)
- Paintbrushes (small, detail brushes work best for watercolor effects)
- Sandpaper (220 grit)
- Small Plate or Palette (for mixing colors)
Step-by-Step Instructions:
Step 1: Prepping the Lampshade
Start by selecting a fabric lampshade. Tamara used a drum shade for this project, but any shape will work.
- Mix the Paint: Combine A Makers' Studio’s One Step Paint with about 20% water to thin it out. This helps the paint absorb into the fabric smoothly.
- Lightly Mist the Shade: Before applying paint, lightly mist the lampshade with water to make the fabric more receptive to the paint.
- Apply First Coat: Use a brush to apply a light, even coat of paint over the entire lampshade. Let it dry completely.
- Repeat for Coverage: Apply a second coat once the first layer has dried. You may need a third coat for fuller coverage, depending on the lampshade’s original color.
- Sand for Smoothness: Once your final coat is dry, use 220-grit sandpaper to gently sand the lampshade. This smooths the fabric and prepares it for stenciling.
Step 2: Applying the Stencils
Choose your stencil design. Tamara selected florals, bunnies, and butterflies to create a whimsical, nature-inspired look. You can mix and match designs for a unique effect!
- Position the Stencil: Place the stencil where you want the design on the lampshade. Tamara suggests burnishing the stencil down firmly with your fingers to ensure it adheres well and prevents paint bleed.
- Apply Gel Art Ink: Using the black Gel Art Ink (Can't Never Could), apply ink over the stencil. Hold the stencil firmly to avoid shifting. Carefully spread the ink with a brush or applicator to ensure it gets into the mesh.
- Peel and Clean: Slowly peel back the stencil to reveal your design. Immediately place the stencil in water to prevent ink from drying on the mesh.
Step 3: Adding Watercolor Effects
Now, it’s time to add color and dimension with a watercolor effect!
- Mix and Dilute Colors: On a plate or palette, squeeze a bit of Gel Art Ink in Grass Is Always Greener, Bless His Heart, Hush Your Mouth, and Well, I Declare. Mix each color with a bit of water to create a lighter, translucent look.
- Layer Colors: Start with the darker shades first, applying color to the leaves, petals, and any other areas where you want depth. Use small, controlled strokes to keep the colors within the stenciled lines.
- Blend with Water: Dip your brush in water and blend out any harsh edges, creating a soft, watercolor-like effect. For added dimension, layer a lighter shade on top of darker colors for highlights.
- Finish with Details: Tamara recommends using a mix of colors, such as light and dark green for leaves, to give a more natural, lifelike appearance.
Step 4: Final Touches
Once you’re happy with your painted designs, let the lampshade dry completely. If you’re planning to add more stenciled details, be sure each layer is dry before applying the next stencil.
Tips & Tricks:
- Experiment with Placement: You can align stencils for a repeating pattern or use a different design on each side of the lampshade.
- Use the Back of Your Brush: Tamara shows how you can use the end of a paintbrush to create tiny dot details in the flower centers for added texture.
- Stay Relaxed with Watercolors: Don’t worry about perfection—small imperfections add to the charm and handmade quality of the piece.
Why Customize a Lampshade?
Tamara notes that designer lampshades can cost hundreds of dollars, but with A Makers' Studio products, you can recreate this high-end look affordably. Plus, custom lampshades add a personal touch to your home decor and make excellent gifts.
For a more detailed walk-through, watch Tamara’s full tutorial on our YouTube channel. Get inspired and see exactly how she brings this project to life from start to finish!
Happy crafting!
Unveiling Our New Christmas Stencil Collection
Welcome to the most exciting time of the year at A Makers' Studio! 🎄
Amy Howard is thrilled to introduce our brand-new Christmas Stencil Collection, a labor of love that's been months in the making. These thoughtfully designed stencils are here to elevate your holiday DIY projects, bringing a vintage charm and timeless elegance to your seasonal decor. Whether you're creating custom gifts, decorating your home, or making cherished keepsakes, our stencils make it easy to add a personal, artistic touch to any surface.
Meet the Christmas Stencil Collection: Elegance and Nostalgia in Every Design
Our new collection features 10 unique designs, each thoughtfully crafted to capture the warmth and spirit of the holiday season. From cozy gnomes and classic Christmas top hats to heartfelt nativity scenes and charming winter landscapes, every stencil in this collection has been designed with incredible attention to detail. The designs evoke a vintage feel that adds sophistication to any project, whether you're making a decorative platter, adorning a pillow, or creating holiday cards.
What You’ll Love About the Christmas Stencils:
- High-Quality, Reusable Tri-Mesh Material: Our stencils are made from durable, patented Tri-Mesh adhesive, allowing for precise detailing that’s both easy to apply and remove. They’re reusable and washable, ensuring you can bring out your favorite designs year after year.
- Versatile for Any DIY Project: These stencils work beautifully on a wide range of surfaces. Use them to embellish wood, glass, fabric, ceramic, and even paper to create everything from gift tags and holiday decor to personalized home accents.
- Perfect for All Skill Levels: You don’t need to be an artist to get professional-looking results. With our stencils, anyone can create stunning, intricate designs with ease. Just choose your preferred paint or ink and watch your project come to life!
Amy’s Favorite DIY Ideas for the Christmas Stencil Collection
During the live launch, Amy shared some of her favorite ways to use these stencils in festive projects that are perfect for holiday gatherings, gift-giving, and more:
- Custom Gift Wrap – Skip store-bought wrapping paper and create custom, eco-friendly gift wrap using kraft paper and stencils. Amy’s tip: Use our red, green, and metallic inks for a truly festive touch!
- Decorative Pillows and Lumbar Cushions – Transform plain pillow covers into holiday decor with stenciled designs that feature snowy winter scenes, Christmas trees, or merry gnomes. Perfect for cozying up any living space!
- Charming Glassware and Coasters – Customize your glassware, mugs, and coasters with holiday cheer. These stencils make it easy to add seasonal flair to drinkware, perfect for holiday entertaining.
- Holiday Gift Tags and Cards – Personalize every gift with custom tags and holiday cards using our stencils. Amy loves using metallic inks on kraft paper tags for an elegant, vintage look.
- Seasonal Tea Towels and Hand Towels – Add holiday designs to tea towels or hand towels with our inks, then heat-set them for washable, long-lasting results. These make fantastic hostess gifts!
Shop the Collection & Bring the Magic Home
This Christmas stencil collection is available now! Due to the high demand, these stencils are expected to sell out quickly. Choose your favorites individually or save 20% with our specially curated bundles. Perfect for yourself or as a thoughtful gift for a crafting friend, these stencils are the ultimate way to celebrate the holiday season.
👉 Explore the Christmas Stencil Collection Here
Get Inspired & Craft a Beautiful Life
At A Makers' Studio, we believe in crafting a beautiful life, one project at a time. Amy invites you to join her in creating handmade holiday magic for your home and loved ones.
So gather your friends, family, or your favorite crafting partner, and start your holiday projects today. And remember, each item you create isn’t just decor—it’s a memory and a gift from the heart.
Happy Crafting, and Merry Christmas!
Transform Your Fall Décor with Mesh Stencils
Fall is here, and with the cooler temperatures rolling in, it's the perfect time to cozy up your home with some beautiful DIY projects!
Join Kayla from Live Oak Nest as she shares her favorite seasonal crafts using A Makers' Studio products.
From charming pillows to custom-painted pumpkins, these creative ideas will add warmth and a personal touch to your home this autumn.
Materials Used
- Mesh Stencils
- Gel Art Ink
- One Step Paint
- Fabric Pillow Covers: Find similar on Amazon
- Heat Gun or Hair Dryer
-
Eco Powder (for casting various items)
Step-by-Step DIY Fall Crafts
1. DIY Turkey Scene Pillow
Transform a simple pillow cover into a stunning Thanksgiving centerpiece with the Turkey Scene Mesh Stencil.
- Insert a piece of cardboard inside your pillow cover to prevent ink from bleeding through.
- Position your stencil on the cover, ensuring it's centered. Smooth it out to adhere well to the fabric.
- Mix two colors of Gel Art Ink—Well I Declare and Well I Swany—for a beautiful light brown shade.
- Apply the ink with a squeegee, working in all directions to ensure full coverage.
- Carefully peel back the stencil, then wash it with warm soapy water. Let it dry sticky side up.
Result: A beautifully detailed turkey pillow, perfect for Thanksgiving!
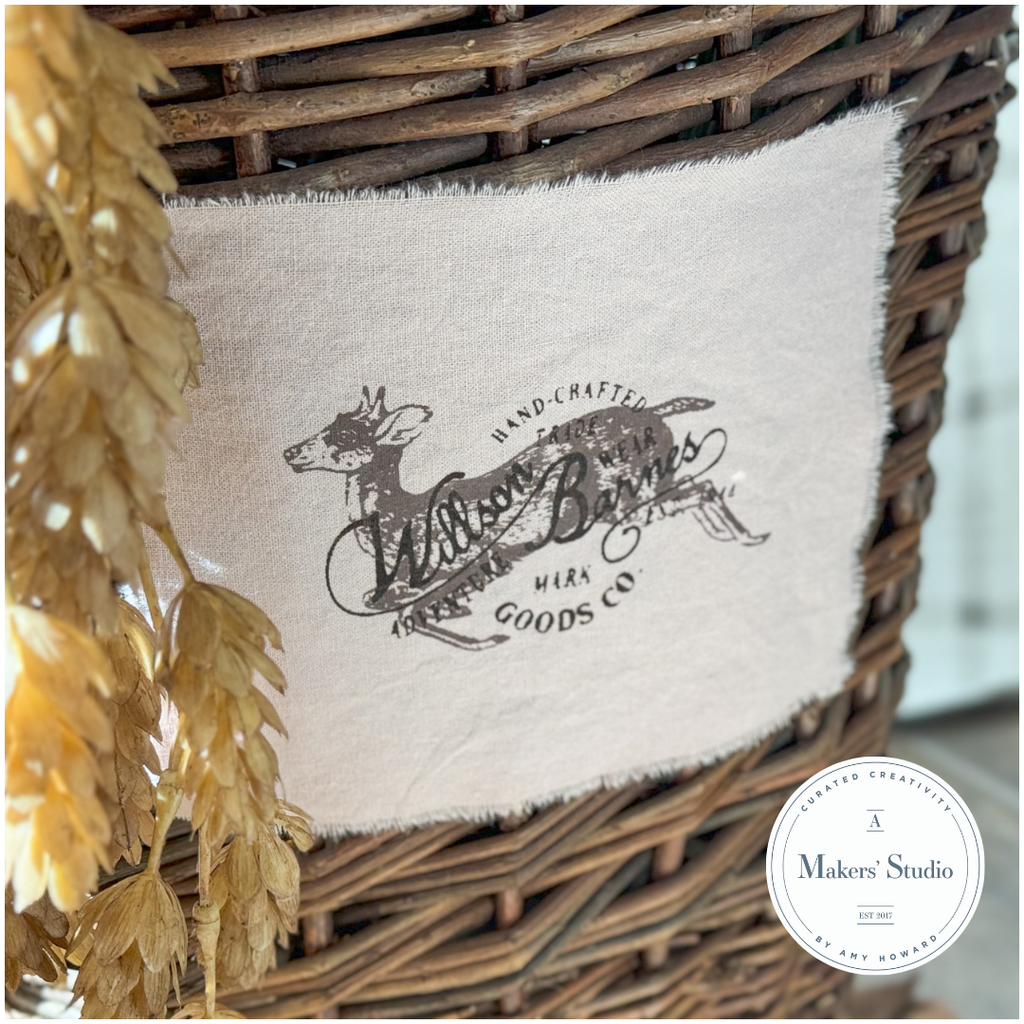
2. Fall-Themed Basket Label
Add a rustic touch to your décor with a custom fabric label featuring the Woodland Creatures Stencil.
- Choose your stencil design—Kayla used a deer motif for a cozy fall look.
- Apply leftover ink from the pillow project to the stencil, smoothing it evenly.
- After applying the stencil, use a heat gun to dry it thoroughly.
- Layer a text stencil over the deer design and use a darker brown ink (Well I Swany) for contrast.
- Once the design is dry, secure the fabric label to a basket using hot glue.
Result: A beautiful basket label, perfect for a fall floral arrangement.
3. Custom Stenciled Ribbon
Create personalized ribbon with the Forest Stencil to add a handmade touch to wreaths, gifts, and more.
- Tear a long strip of fabric and smooth it with a hair straightener for a flat surface.
- Place your stencil (Kayla used a pear design) on the fabric strip.
- Mix dark and light colors of Gel Art Ink to create a softer hue.
- Use a squeegee to apply the ink evenly over the stencil.
- Repeat the stencil design along the ribbon for a custom, block-printed effect.
Result: A unique ribbon perfect for fall wreaths and festive wrapping!
4. Hand-Painted Faux Pumpkins
Give old faux pumpkins new life with Amy Howard's One Step Paint in soothing shades of blue.
- Apply a base coat of your darkest blue paint for solid coverage.
- Mix in lighter shades to create a layered, textured look with dry brushing.
- Use a small pointed brush for deeper shadows, adding dimension to your pumpkins.
- Finish with real dried stems from last year’s pumpkins for a realistic touch.
Result: Gorgeous, custom-colored pumpkins that complement any fall décor.
5. Charming Fall Dishes
Turn simple butter dishes into lovely fall accents with the Field of Pumpkins Stencil.
- Apply No-Bake Ceramic Paint in a rich, dark chocolate hue to the stencil.
- Position the stencil on your dish and press the ink through the mesh.
- Carefully peel back the stencil to reveal a beautiful, vintage-inspired design.
Result: Delicate dishes that add charm to your table settings or serve as adorable ring holders.
Wrap-Up
We hope you’ve enjoyed these creative ideas for DIY fall décor!
Whether you’re adding a personal touch to your pillows, creating custom labels, or giving new life to faux pumpkins, these projects are sure to warm up your space this season.
Happy Crafting!

Angel Wing and Crown Molds Launch
We are thrilled to introduce two stunning new silicone molds to A Makers’ Studio— the Angel Wings Mold and the Set of Crown Molds!
These timeless designs will add elegance and sophistication to your DIY projects, whether you're creating home decor, ornaments, or even custom gift tags.
In this blog post, we’ll walk you through Amy Howard’s latest workshop where she shares creative ways to use these versatile molds for all your crafting needs.
Materials Used:
- Angel Wings Silicone Mold
- Set of Crown Silicone Molds (Set of 7)
- Eco Powder
- Resin
- Gold Leaf
- Gilding Size
- Tapered Candle Mold (for wax molding)
- Pipettes
Step-by-Step Process
1. Mixing the Eco Powder
To start, mix Eco Powder with water at a 2:1 ratio. Stir until the consistency is smooth and ready to pour. The Eco Powder is an innovative, easy-to-use material that feels like ceramic once set but doesn't require heating. It's perfect for casting molds like the Angel Wings and Crowns.
2. Pour the Mixture into the Molds
Use a pipette to fill the intricate details of your mold, particularly for smaller crowns. For larger molds, pour the mixture directly into the mold. Allow the molds to sit undisturbed for 30-45 minutes to set.
3. Demolding
After your mold has set, carefully demold your creation. Gently pull the sides of the silicone mold to release the casting. The Angel Wings mold is particularly easy to work with and includes a pre-made hole to easily thread ribbon for hanging.
4. Gilding the Angel Wings
For a beautiful, luxurious finish, apply Gilding Size to the raised areas of the wings. Once the size becomes tacky (after about 5 minutes), press Gold Leaf onto the surface and gently brush off the excess with a chip brush. This process highlights the detailed feathers and adds a regal touch.
5. Creative Uses for the Molds
- Ornaments: Use the Angel Wings Mold to create stunning Christmas tree ornaments. Add a ribbon or string through the pre-made hole and you're set!
- Gift Tags: Write "To" and "From" on the back of the wings or crowns using a gold metallic pen and attach them to holiday gifts for a personalized, high-end look.
- Home Decor: Gilded crowns make wonderful drawer pulls or embellishments on jars and candles. You can also create butter molds using the smaller crown molds for an elegant touch to your dinner table.
6. Endless Possibilities
You can even use fondant with the Crown Molds to create custom toppers for cupcakes. For a unique family tradition, use these molds to decorate your holiday desserts—perfect for a special "Happy Birthday to Jesus" moment during Christmas.
Shop the New Molds!
These gorgeous new molds are available now on our website. Don’t miss out on the launch discount—use code CROWN20 at checkout for 20% off the Angel Wings Mold, Set of Crown Molds, and all accompanying materials. Start crafting with the best materials and elevate your DIY projects today!

Decorating Pumpkins with Stencils & Dried Flowers
Get ready to add a unique and creative twist to your fall décor!
In this tutorial, Tamara teaches you how to use stencils and dried flowers to create beautifully decorated pumpkins—perfect for Halloween, Thanksgiving, or any fall event.
Whether you're using real or faux pumpkins, this project is easy and fun for all ages.
Materials You’ll Need:
- Fall Stencils Collection
- Gel Art Ink in Gold
- Copycat
- Dried Flowers
- Stencil Brushes
- One Step Paint in Baja Buff
- Faux or real pumpkins
- Tweezers
- Wax paper
- A small paintbrush
- Sticks for stems (optional)
Step-by-Step Instructions:
1. Prepare Your Pumpkin:
Start by choosing your pumpkin. You can use a real or faux pumpkin for this project. Tamara used a foam pumpkin for the demo. Paint your pumpkin with One Step Paint for a solid base—Tamara used Baja Buff for a light, neutral tone. Let the paint dry completely before moving to the next step.
2. Apply the Stencil:
Pick your stencil from the Fall Stencils Collection. Tamara used the leaf pattern from the Running Bunny stencil. Apply the stencil on the pumpkin, making sure it's flat against the surface. For curved surfaces, use Stencil Brushes for better control instead of a scraper.
3. Add Color:
Using Gel Art Ink in gold, gently brush over the stencil to create your design. Carefully remove the stencil once the ink is applied, and set it aside to dry.
4. Prepare the Dried Flowers:
Next, grab your Dried Flowers and arrange them in a way that complements your stencil design. Use tweezers to handle delicate flowers. Tamara suggests laying them out on wax paper before applying them.
5. Apply Copycat Decoupage Gel:
Using Copycat, coat the back of your flowers and carefully place them onto the pumpkin. Gently press the flowers down with the end of your paintbrush to make sure they stick. For thicker flowers, add a bit more decoupage gel on top to hold them in place.
6. Layer and Build Your Design:
Continue layering stencils and flowers to create a multidimensional effect. You can even paint over some of your stenciled areas to add more depth and color.
7. Let It Dry:
Allow your decorated pumpkin to dry for at least a couple of hours to ensure everything is securely in place.
8. Optional Finishing Touches:
If you want to add even more detail, consider applying a light coat of Antiquing Wax to give your pumpkin an aged, rustic look. You could also use sticks from your yard as stems to finish the look.
With just a few materials and some creativity, you can transform ordinary pumpkins into unique works of art! These decorated pumpkins make the perfect centerpiece for your fall table, or they can serve as beautiful gifts.
Start crafting your beautiful life with these unique pumpkin projects today! And don't forget to shop all the materials you need at A Maker’s Studio.