Inside A Makers' Studio
Inside A Makers' Studio

TELL THE WORLD: LOVE GROWS HERE
Your home is a place where you feel most comfortable, safe, and loved. What better way to tell that to your guests than with a sign that says “Love Grows Here”? This week on our Maker Monday on Facebook, Amy is showing Makers how to create a lovely piece for your home or loved ones. This artwork makes the perfect housewarming project, whether for yourself or someone else!
MATERIALS YOU’LL NEED
- 10x10 wood surface
- English Walnut Gel Stain
- Peace and Joy ChalkArt™
- Metallic Gold ChalkArt™
- Love stencil (sold out)
- Alphabet stencil
- French Script stencil
- Sponge brush
- Artist brush
- Spreader
You will also need printer paper, scissors, and a hot glue gun.
HOW TO MAKE YOUR “LOVE GROWS HERE” SIGN
1. Apply the English Walnut Gel Stain to your surface with your sponge brush, using consistent strokes. Allow it to dry.

2. While your gel stain dries, apply the French Script stencil on blank printer paper and paint the stencil with the Metallic Gold ChalkArt™ using the spreader in your kit. Clean your spreader and allow the paper to dry.
3. Lay the “Love” portion of your stencil about three-quarters of the way down on your board, allowing room above for your flowers. Apply the Peace And Joy ChalkArt™ with your spreader, then remove the stencil. Wash it and lay flat to dry.


4. With your artist brush and the Peace and Joy ChalkArt™, freehand a string in the top third of your board. This “string” will hold your flowers.
5. Use the Alphabet stencil to stencil the words "grows here" underneath the word "love."

6. Cut circles out of the paper with the French script on it. Then cut the circle into a spiral. Roll up the paper from the inside edge to create a flower. Once you have your flower shaped, use your hot glue gun to glue the flower to your board.
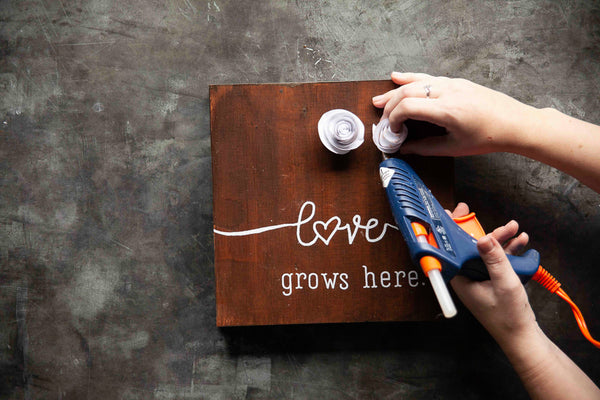
7. For the other flower, cut out petal shapes and then cut a slit in the bottom of each “petal” so you can connect them. Once your flower petals are connected, glue the edges together and hot glue it to your board.
Of course, if you want more of Amy’s tips and tricks, tune into the Maker Monday video, which is recorded on our Facebook page.
MORE FROM MAKER MONDAYS
Don’t forget to watch Maker Monday on our Facebook page every Monday at 10am Central. Amy will be there each week to give you tips on your next kit or Maker project, so “Like” and follow us so you can see her!
We’re looking forward to crafting a beautiful life with you.
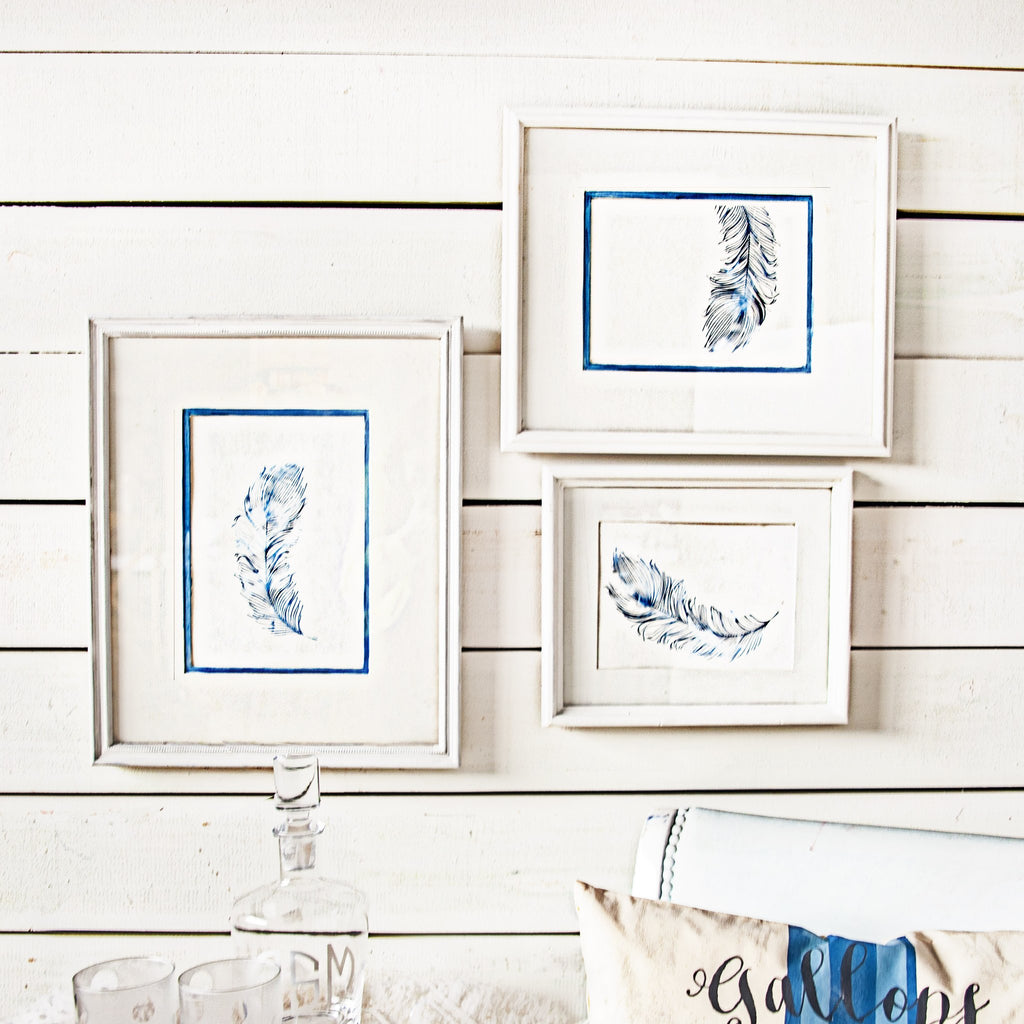
DIY FEATHER ART AND FRAME
This week on Maker Monday, Amy is showing us how to create our very own feather art using the Feather Art Fun Maker Monday Kit. Check out the video on Facebook and follow this step-by-step tutorial to create a feathery piece of art that will give your décor wings!
What You’ll Need
Feather Fun Art DIY Kit, which includes:
- Watercolor paper
- Well, I Declare Gel Art Ink
- Hush Your Mouth Gel Art Ink
- Blessed Rescue Restore Paint
- New Baby 9x12 stencil
- Spreader
- Sponge brush
- Artist brush
Other materials you may need (or want):
- An old frame with a mat to repaint
- Gilding Size
- Gold Leaf
HOW TO MAKE YOUR OWN FEATHER ART
If you choose to use a store-bought or already-finished frame, skip Steps 1 and 2.
- Take your frame apart and paint the frame with your Blessed Rescue Restore Paint, making sure to get consistent coverage with a sponge or chip brush.
- Paint the inside bevel or outside lip of your frame’s mat with Hush Your Mouth Gel Art Ink. Make sure to water it down with one part water, one part paint for a beautiful watercolor layer. Set both the frame and mat aside to dry while you work on your feather art.
- Place the feather stencil on your watercolor paper where you would like it.
- Apply Hush Your Mouth Gel Art Ink to sections of the feather stencil with your spreader. Do not cover the whole stencil, as you’ll be filling in the rest with the other Gel Art Ink color.


5. Apply Well, I Declare Gel Art Ink to the remaining sections of the feather, blending the colors together to completely fill in the stencil. Let both layers of Gel Art Ink fully dry before moving on.
6. If you want to add Gold Leaf to your feather art, apply Gilding Size to a few accent areas on your (fully dry) feather. Allow the Gilding Size to come to tack, meaning oily and slightly sticky, but not wet. Then, lay down a section of your Gold Leaf on to your feather. Using a dry chip brush, flake away extra Gold Leaf.
7. Cut down your watercolor paper to fit your frame and mat. Then, attach your finished watercolor feathers to the back of the mat and place everything back into the frame.
Look at that beautiful work of art! With the help of this Maker Monday DIY kit, you’ll have a lovely feather painting (and frame) to show off in less 2 hours. If you want more step-by-step directions or you like following along as Amy works, check out this week’s Maker Monday video below.
If you want to see more easy tutorials and learn more about how to make the most of your Maker Monday project, tune in every Monday at

DIY MONOGRAMMED TOTE BAG
We all love super cute monogrammed tote bags, the ones that make a statement and can be used for virtually anything. But they cost so much more if you buy one from the store or a custom online shop… not to mention searching high and low for your perfect monogram design! We think everyone should be able to have a beautiful monogrammed tote bag, so today we’re sharing this fun and simple DIY monogrammed tote bag project.
MATERIALS NEEDED FOR YOUR DIY MONOGRAMMED TOTE BAG

- Your favorite 2 oz. Rescue Restore Paint
- A complimentary 2 oz. Rescue Restore Paint color
- Alphabet Monogram Stencil
- Foam Dome Brush 1.5”
- Masking tape
- A Makers’ Studio canvas tote bag
- Optional: Gold ChalkArt™
- Optional: Gilding Leaf for pineapple stencil*
* Pineapple stencil is included on the Alphabet Monogram stencil
HOW TO MONOGRAM A TOTE BAG
- Lay your tote flat on a surface, making sure to press out wrinkles or bumps.
- Choose the monogram for your initials and place them where you want them on the bag.
- Apply your first Rescue Restore Paint color to the first initial, making sure to apply an even layer to the fabric with your Foam Dome Brush. Let the first letter dry before applying the second and third. Repeat until all three initials are complete.

4. Wash your brush and the stencils, letting them dry thoroughly.
5. When letters are dry, lay out 2 strips of tape vertically across the tote, 1 1/2 inches apart. These vertical lines should align with your monogrammed initials.
6. Next, lay two pieces of tape horizontally across tote to protect the letters. These tape lines will also align with your initials and intersect the vertical tape lines.

7. Use the Foam Dome Brush to apply your second Rescue Restore Paint color to the taped off sections. Remove tape gently and allow to dry thoroughly.

8. Once your first stripe is dry, tape off 2 1/2 inch sections on either side of the middle stripe. Lay 4 pieces of tape vertically and 2 pieces horizontally to protect the middle strip and your monogrammed letters.

9. Use the Foam Dome Brush to apply the same Rescue Restore Paint color you used on your monogram letters. Remove tape immediately after application and allow the paint to dry.

10. Apply the pineapple stencil to the center strip, just above your initials. Use Rescue Restore Paint or Gold ChalkArt™ to paint the pineapple stencil on your tote.

11. Optional: For extra sparkle, you can apply your choice gold, silver, or copper gilding to the paint.
12. Let the paint dry overnight before using your new bag. Then, #enjoythebraggingrights — and a beautiful tote!
Because our Rescue Restore Paint is made with high-quality, natural pigments, you can expect your tote to handle plenty of use. Make one for yourself and all your friends, or apply these same steps to other materials, like lunch bags, pouches, and more. Make sure to take care of your stencils so you can use them again and again.
We want to see you wearing your new DIY monogrammed tote bag, so share it with us! Tag @amakersstudio on Instagram and use #enjoythebraggingrights to make sure we (and your community of fellow Makers) can see your beautiful work!