Inside A Makers' Studio
Inside A Makers' Studio
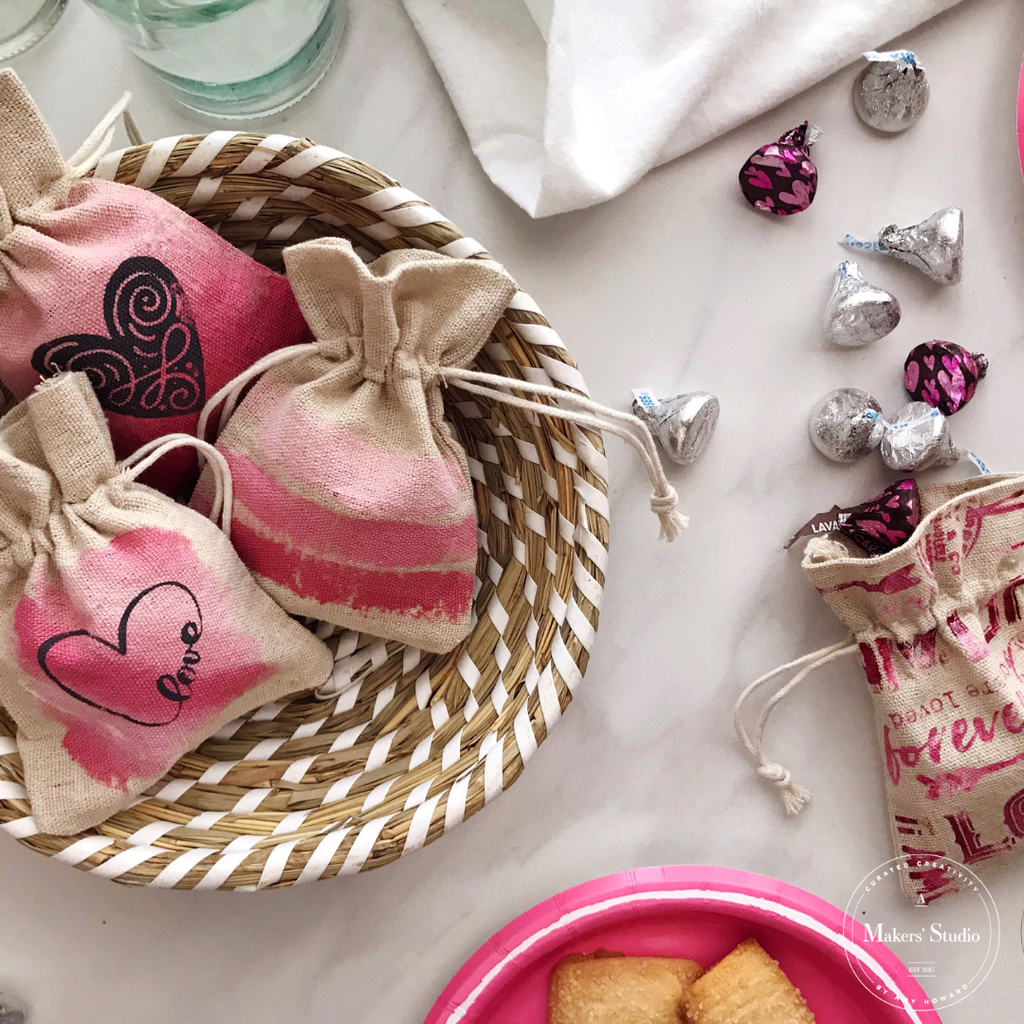
Valentine's Treat Bags
The holiday of love is right around the corner, and we have the cutest craft for those sweethearts in your life! Join us as we craft some Valentine's treat bags using just a few supplies.
Products needed:
- Your favorite Valentine's Mesh Stencil (we used Love Love Love)
- Bless His Heart - Gel Art Ink (red)
- Pretty as a Picture - Gel Art Ink (pink)
- Can't Never Could - Gel Art Ink (black)
- Artist Brush
- ChalkArt Spreader
Other supplies:
- Small canvas or cloth bags
- Small container
- Water

Step 1
Add a small amount of the red and pink Gel Art Ink to separate containers and add 4-5 drops of water to each. Mix with the Artist Brush.

Step 2
Take the Artist Brush and paint the bottom most section of the canvas or cloth bag using the red Bless His Heart Gel Art Ink. You may be as detailed or imprecise as you'd like!

Now use the pink Pretty as a Picture Gel Art Ink to paint the top part of the bag leaving a space in the middle between the pink and red.

Now that you've painted the red and pink sections, add a drop of Bless His Heart (red) to the container of Pretty as a Picture (pink) and mix well to create a color between the two shades. Paint the blank middle of the bag, blending the sections desired to create an ombre effect.

Step 3
Take the Love Love Love Mesh Stencil (or your chosen design), and cut out the part you'd like to use on the bag. Peel the black mesh off of the white backing and place on the bag in the desired spot. Be sure to burnish (rub) the stencil well so it adheres to the bag in all areas.

Step 4
Using the ChalkArt Spreader, apply the Can't Never Could (black) Gel Art Ink in a sweeping downward motion, pushing the ink through the mesh. Be sure to keep your ink on top of the stencil.
Tip: You may place painter's tape around the adhered stencil to keep from going outside the lines!

Peel away the the stencil to reveal your detailed Valentine design!
Tip: Be sure to immediately wash your Mesh Stencils, rubbing the ink out of the mesh under running water and leaving to air dry sticky side up!

Repeat as desired for each of your bags. Get creative and think outside the box!

Finally
Stuff with candy or fun little notes, and enjoy handing out your custom treat bags to all your Valentines!

Check out all of our Valentine's and love themed Mesh Stencils and get to crafting here!
Want to watch the video? Amy and Michelle made their own Valentine's bags and you can follow along with them!
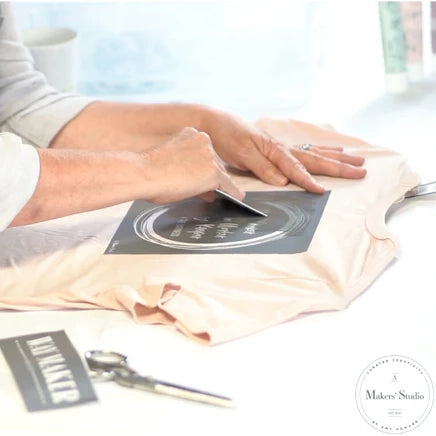
DIY Inspirational Shirt | Using Mesh Stencils
Imagine inspiring someone's life to be better just by going about your day with a great message printed on what you're wearing.
With a few tools from A Maker's Studio, you can do exactly that and turn simple, everyday shirts into joyful and inspiring pieces for everyone to see.
STEP 1: PICK A STENCIL AND A COLOR

Choose a reusable mesh stencil design that you like and a Gel Art Ink color to match.
For this project, we are going to use the Way Maker Mesh Stencil and Hold Your Horses - Gel Art Ink.
STEP 2: PREP YOUR SHIRT
Put a cardboard on the inside of the shirt you are working with.This will help make sure that the paint you are applying on either side of the shirt doesn’t bleed through the other.
STEP 3: APPLY THE STENCIL
Remove its backing to expose the stencil's adhesive side and carefully place it on your shirt.
STEP 4: COLOR IT UP

Squirt some Gel Art Ink along one edge of your spreader. Hold your spreader at a 45-degree angle and spread the ink evenly over your stencil. Make sure that you are pushing the Gel Art Ink adequately through the mesh and onto the shirt.
STEP 5: LET IT DRY

When you're done, gently peel the stencil off and allow the ink on your shirt to air dry for at least two hours.
STEP 6: WASH YOUR STENCIL

Don’t let the ink dry on your stencil. Wash it right after use.
Place your stencil in water and use a clean rag to help wipe the ink off of it.
Then, take your stencil out of the water and lay it on a flat surface with the adhesive side up. Leave the stencil to air dry.
STEP 6: IRON THE PRINT

Place a lint-free rag on top of your design. Go over the rag with an iron for about 5 minutes. The heat is going to help the ink to set.
SOME REMINDERS:
If you get some of the Gel Art Ink on other parts of the shirt where you don't want it, wipe it off with a clean rag before it starts to set.After using your newly designed shirt, turn it inside out and wash it with cool water. Keep it out of the dryer to prevent the design from fading quickly.
If you need to use a dryer, use the cool setting and keep the shirt turned inside out.
Start spreading joy and inspiration today using these products:
Mesh Stencil - Way Maker
https://amakersstudio.com/products/mesh-stencil-way-maker-8-5-x-11
Gel Art Ink - Hold Your Horses
https://amakersstudio.com/products/gel-art-ink-hold-your-horses
DIY - Groovy Tote Bag
Get the cutest tote bag look with Lianep from DIY Beauty on Purpose! She'll walk you through how to use and place mesh stencils, choosing placement, and using Chalk Art! We are in love with this cute tote!! 💛
Products Needed:
Additional Supplies:
- Tote Bag
- Scissors
- Masking Tape or Lint Roller
- Towel
- Cup

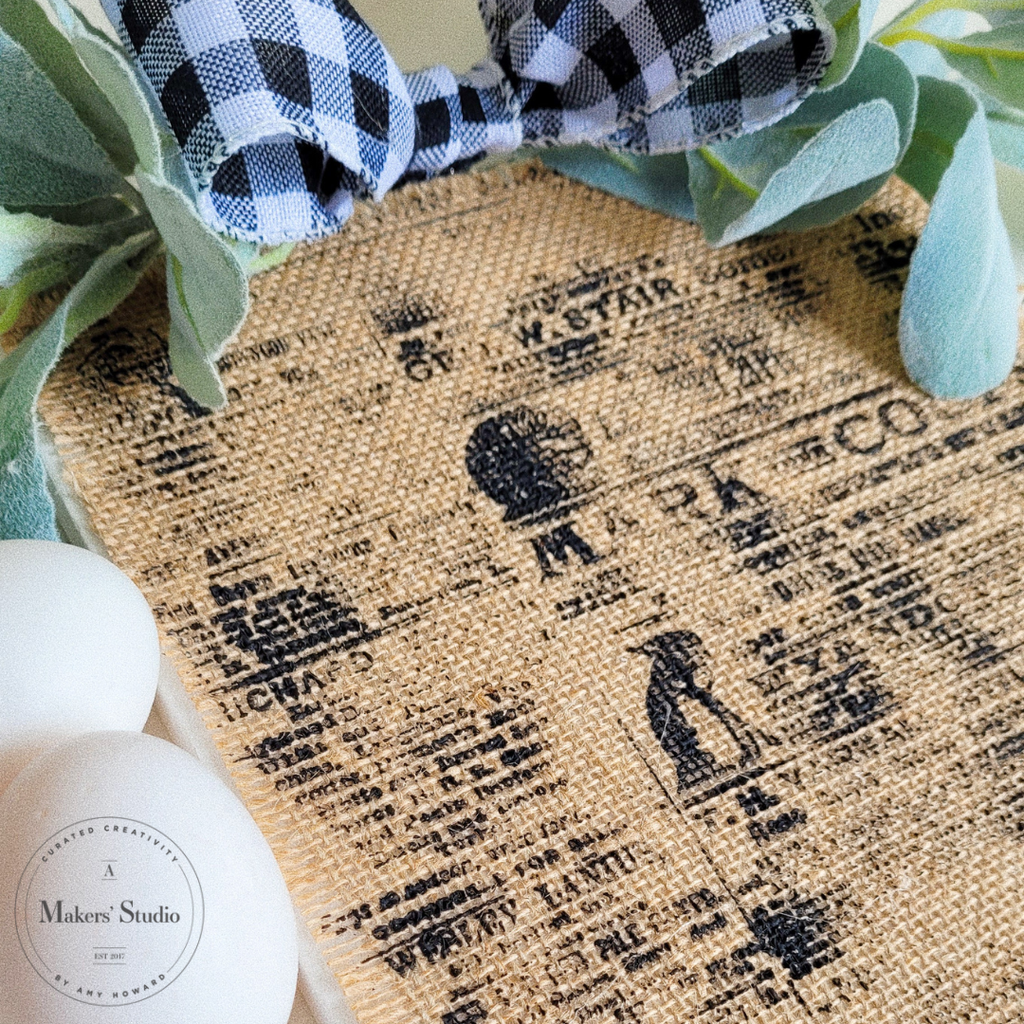
DIY Burlap Fall Decor (With Mesh Stencils)
Shop What She Used:
Additional Supplies:
- 8.5 x 11 Canvas
- Laminated Burlap
- Plaid Ribbon
- Lambs Ear Stem
- Thumb Tacks
- Plastic Plate
- Scissors
- Hot glue gun
- Floral Wire
- Nail

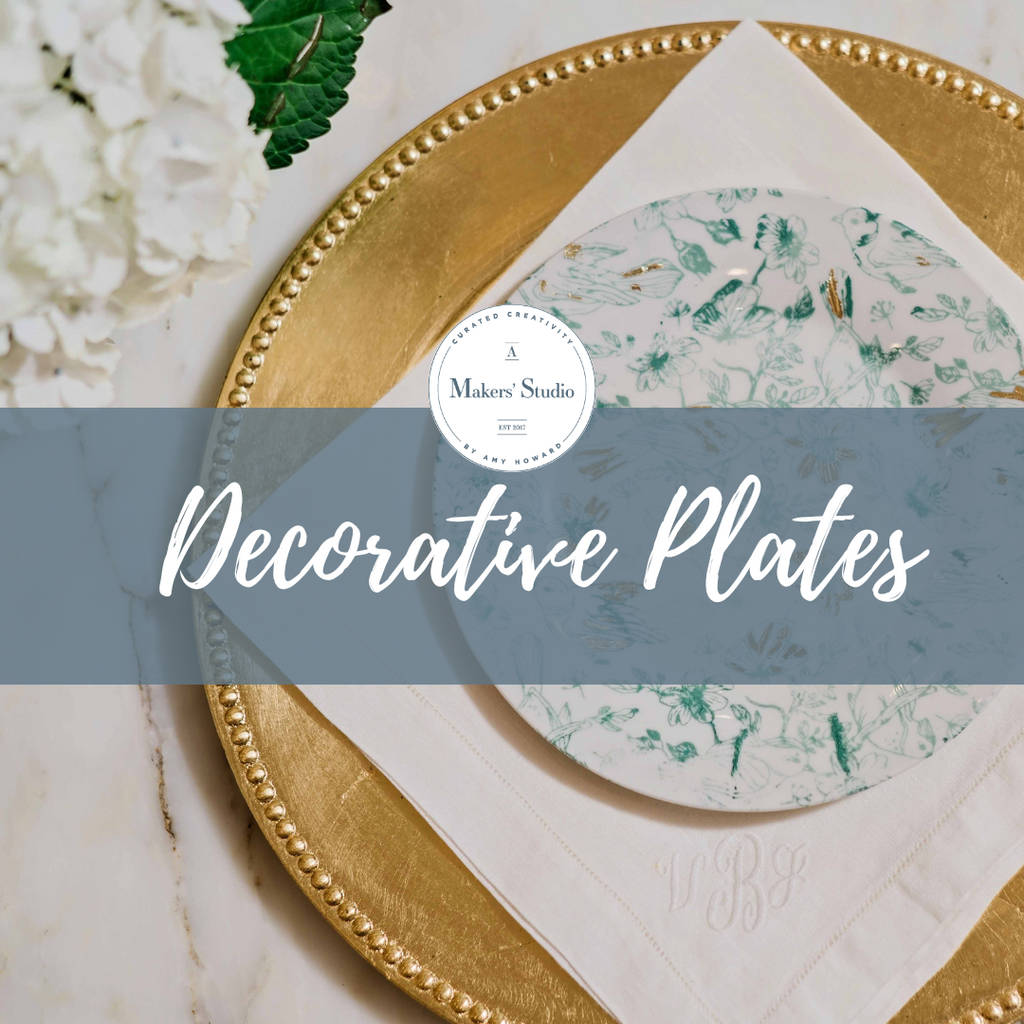
DIY Decorative Plates
Looking for a nice little touch to make your dining room table decor stand out? A'Makers Studio's got you covered! What better statement piece than DIY decorative plates. It is sure to grab your guests eyes! Take a look below to find out how to make your own!
Products Needed:
- Birds and Buttercup- Mesh Stencil
- Ceramic Paint - Smoke gets in my Eyes
- Angled Squeegee
- Gilding Size
- Your Choice of Leaf (we used Gold Leaf)
- Artist Brush (or any small paint brush)
- Chip Brush (or any medium sized paint brush)


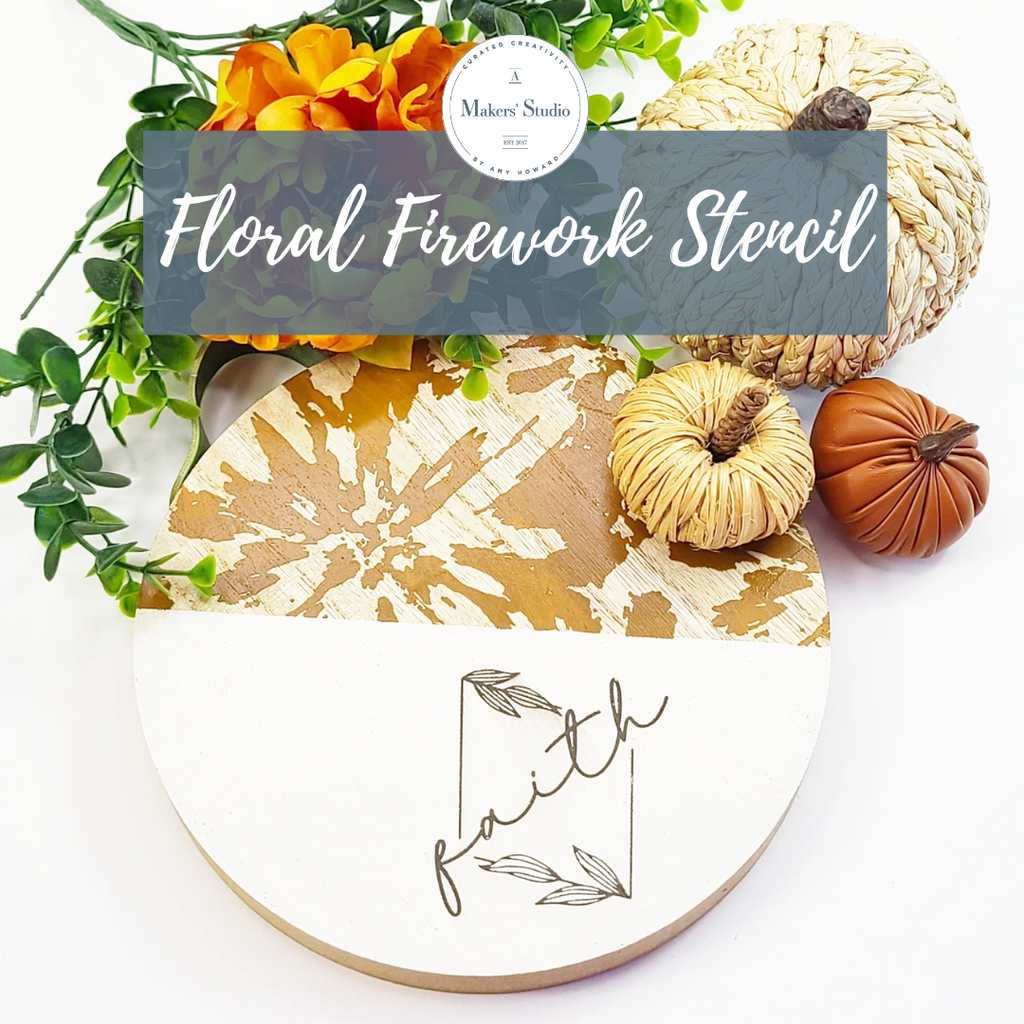
Fun Fall DIY
The perfect cutting board for the upcoming FALL season. This stencil will create a fabulous background on any surface. Watch Lianep from DIY Beauty on Purpose as she takes you step by step on this fun DIY decor!
Products Needed:
Additional Supplies:
- Masking Tape
- Scissors
HOW TO

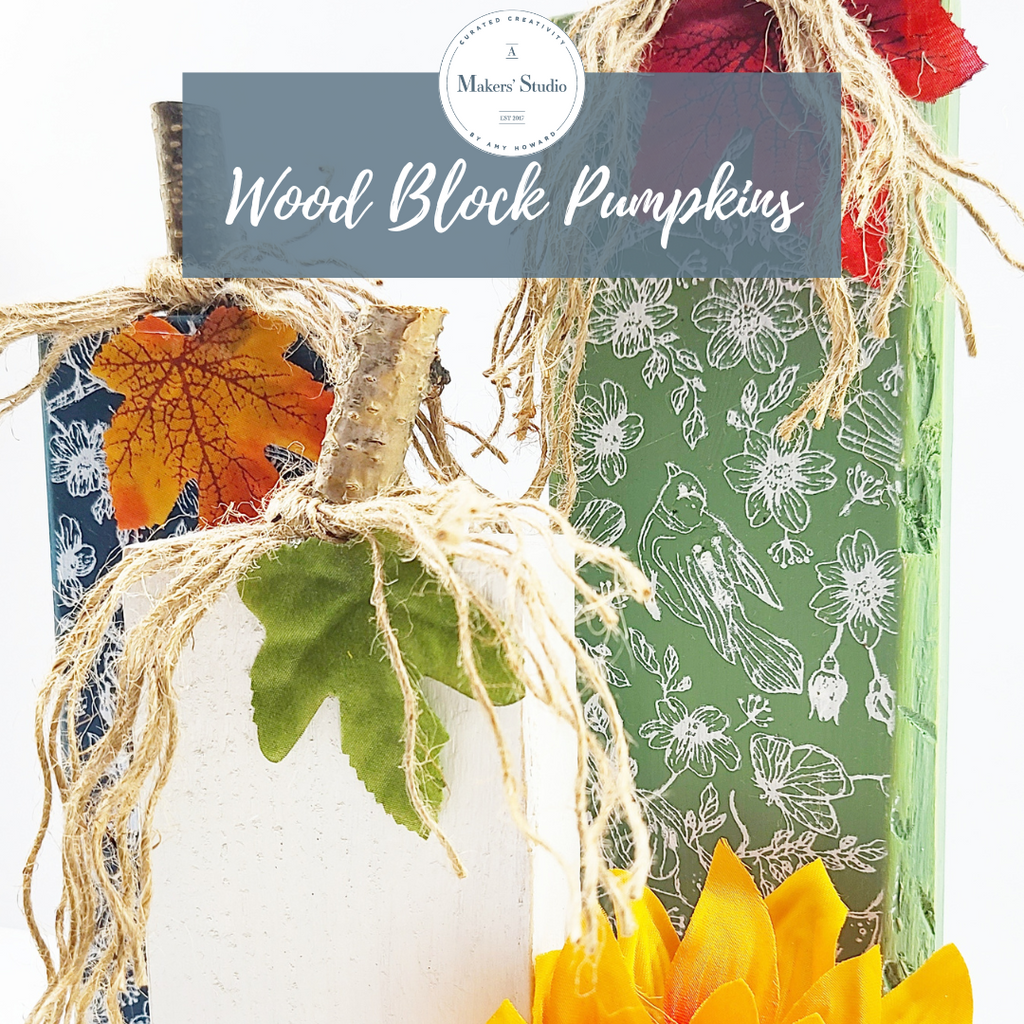
How To: Wood Block Pumpkins
It's (almost) fall y'all! We have fabulous new Mesh Stencil designs dropping for the season. Watch Lianep from DIY Beauty on Purpose use the NEW Birds and Buttercups Mesh Stencil to create wooden fall décor pieces. Don't miss it; we can't wait to see what you make!
Shop What She Used:
- Birds and Buttercups - Mesh Stencil
- Angled Squeegee
- English Boxwood - One Step Paint
- Midnight Dreams - One Step Paint
- Ballet White - One Step Paint
- Well I Declare - Gel Art Ink
Additional Supplies:
- Wood Blocks
- Short Wood Branches (for pumpkin stems)
- Jute or Twine
- Fall Leaves (fake or real)
HOW TO

For more fun tutorials and products, visit our blog at A Makers' Studio.com!
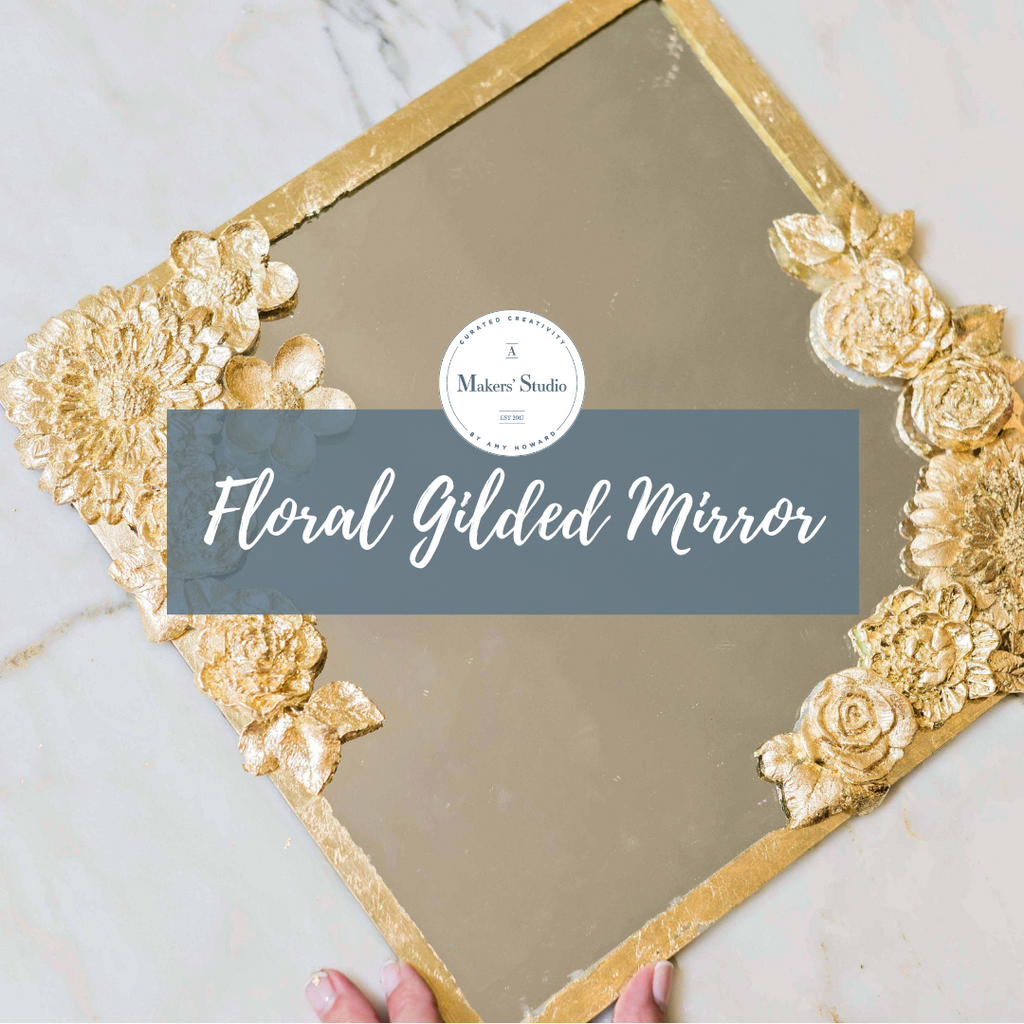
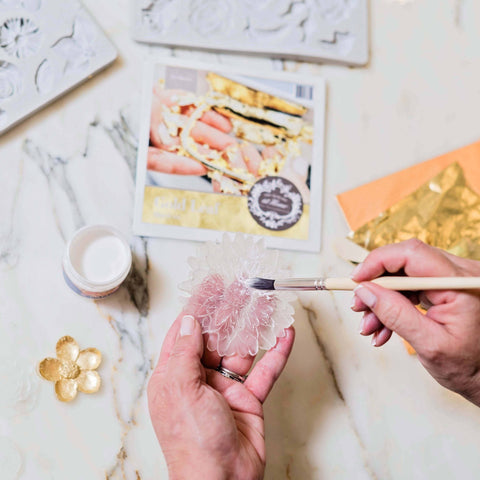
Floral Gilded Mirror
This DIY takes a plain or thrifted mirror and turns it into your favorite piece of décor. Decorate your home with custom pieces made yourself with just a few products from A Makers' Studio. Whether you enjoy a sleek modern look or an antique vintage vibe, our new line of Decorate Molds are a must have.
Products Needed:
- Acrylic Glacier Resin Bundle
- Your Choice of Decorative Mold (we used My Flower Garden and Rose Garden)
- Gilding Size
- Your Choice of Leaf (we used Gold Leaf)
- Resin Measuring Cup (or any disposable cup on hand)
- Artist Brush (or any small paint brush)
- Chip Brush (or any medium sized paint brush)
- Light and Dark Wax (optional to antique)

Step 1
To make your final piece more flexible (if applying to curved surfaces), simply pour in your mixture of 60% resin with 40% hardener and mix well for 3 minutes. Pour into the mold and allow to dry overnight. Pop out your design and apply with super glue to your frame, furniture, or decorative object.
The recipe to make the resin very hard and inflexible would be a 1:1 ratio of resin and hardener. Measure to ensure exact mixing ratios. Your working time is 20 minutes once mixed. Your gel time is 30 minutes. Allow the surface to dry for 6-9 hours. For crafting, your through dry time is 10-14 hours. We recommend letting it cure overnight.
If you prefer using air dry clay in lieu of resin, you will notice some shrinkage and cracking. Be aware that air dry clay will not give you the detail that you can get with Resin.

Pour mixture into your choice of Decorative Mold and let cure overnight. Pop out of the mold once hardened.


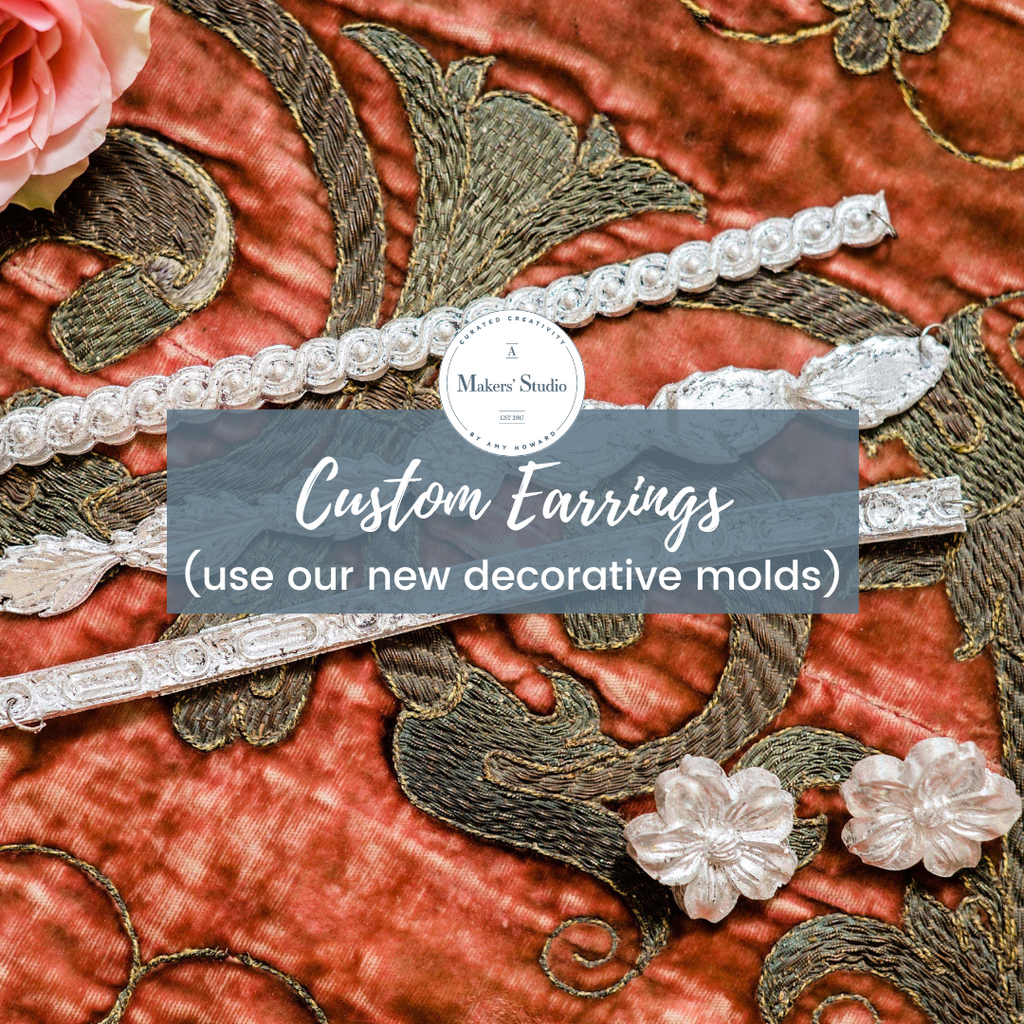
Custom Earrings With Decorative Molds
This is your new DIY best friend! Say hello to your new obsession... There is so much you can do with our new product. Carefully designed for you, you can make custom detailed accents, hardware, jewelry, and so much more! Scroll below to see how we made custom earrings with our new favorite DIY accessory..
Amy Howard at Home Decorative Molds are perfect to use with the Acrylic Glacier Resin to create your own custom embellishments and raised decoration on your furniture pieces. Our silicone molds have a natural release and do not stick.
The detail on our molds will be quite exquisite due to the depth in each. You can use these molds over and over again
Shop Our NEW Line Here

Acrylic Glacier Resin + Fondant Molds = match made in heaven!
Let Us Show You How To Make Custom Earrings

Our NEW Decorative Molds pair wonderfully with our Acrylic Glacier Resin and Hardener mixture. The options are truly endless with 21 different Molds to choose from!
Step One
To make your final piece more flexible so as to apply to curved surfaces, simply pour in your mixture of 60% resin with 40% hardener and mix well for 3 minutes. Pour into the mold and allow to dry overnight. Pop out your design and apply with super glue to your frame, furniture, or decorative object.
The recipe to make the resin very hard and inflexible would be a 1:1 ratio of resin and hardener. Measure to ensure exact mixing ratios. Your working time is 20 minutes once mixed. Your gel time is 30 minutes. Allow the surface to dry for 6-9 hours. For crafting, your through dry time is 10-14 hours. We recommend letting it cure overnight.
If you prefer using air dry clay in lieu of resin, you will notice some shrinkage and cracking. Be aware that air dry clay will not give you the detail that you can get with Resin.
Shop Our Acrylic Glacier Resin Bundle Here

Step Two
Pour Mixture Into Your Choice Of Decorative Mold And Let Cure Overnight

Step Three
Pop Out Your Design Then Apply Gilding Size. Simply Apply Gilding Size With An Artist Brush And Let The Solution Become Tacky (not completely dry) Before Starting Step Four

Step Four
Apply Sterling Silver Leaf Over Entire Surface Area. The Silver Leaf Will Cling To The Gilding Size. Then, Brush Off Excess With An Artist Brush.

Step Five
Attach Jewelry Hardware And You're Done! You Have The Cutest Custom Earrings That You Can Gift Or Keep For Yourself!

What Will You Create?


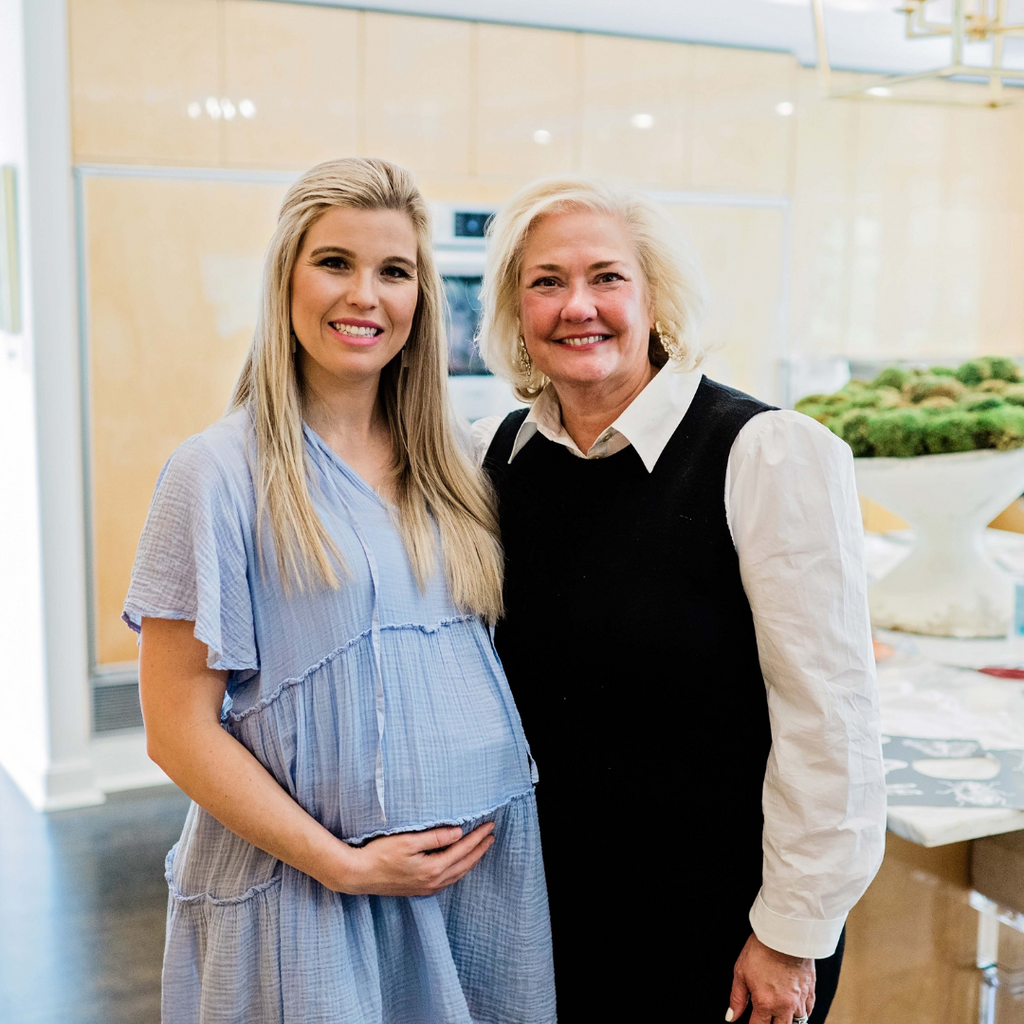
A DIY Baby Shower of Your Dreams
One of the many things that brings me the greatest joy is entertaining in my home. Special moments like weddings, baby showers, Christmas, egg hunts for Easter, holidays, etc. are opportunities to bring our home to life.

When our son and daughter-in-love shared with us that they were expecting, we wanted to host a shower for her. My daughter Brooke, my dearest friend Karen and Carol, a dear friend of Lee’s, were my co-hosts.
I wanted to create a shower that the ladies could make gifts with their hands and give them to Lee as a gift at the end of the shower. That would also create fun and excitement for the attendees. I loved seeing their creativity come to life and even laughing at their happy mistakes. It was all about the fun and making friends while honoring Lee and celebrating the upcoming arrival of Neff (named after my dad!).


I was determined to make all of the food from scratch and not use a caterer. It is more of a labor of love cooking and preparing for events like this. I am grateful to have a husband who loves cleaning the kitchen. My love of cooking and his love of cleaning have been such a blessing.

Carol Martin hand made all of the flower arrangements as well as the flower wreaths for the front door. It was a beautiful Spring Saturday and we started around 10 am. We invited the ladies into the kitchen to start their crafts and making their onesie. Janet flew all the way in from North Carolina to be a part. She has such a gift of serving others. You can see it on her face that it brings her immense joy. She was sharing with the ladies and showing them how to use the inks, stencils and tools. It was so cute to hear them squeal, being a little scared of messing up and then being so happy and proud at their creations. Everyone was having so much fun creating that I had to stop them to move on to get their food. We had lots of fresh fruit with yogurt, veggies, a sausage egg casserole, onion dip, a beautiful cake from Frost, chicken and biscuits etc.. I tried to keep everything somewhat brunch finger food.


We proceeded to go into the family room and I shared with the ladies that love giving a blessing over a mom-to-be; to give her a pearl of wisdom/advice on something you wish someone had shared with you with your first child. I always cry with these. It is such a sweet thing to speak into a young momma’s life about how to raise her children and not make your same mistakes.
Karen had so many cute games that we enjoyed while Lee was opening her gifts. I loved that she had gotten these adorable children’s books as gifts, that we were to write words of encouragement, words of wisdom or a favorite verse. Such a sweet idea. We also all filled out cards of advice to put together in a book for her.

All of the guests were so generous in their giving and Lee was thrilled and excited. We all lined up in the entry to get photos and loved on her. My heart was so full. What a beautiful day it was. The excitement of the baby to come and celebrating the gift of life was such a blessing.
Hugs,
Amy

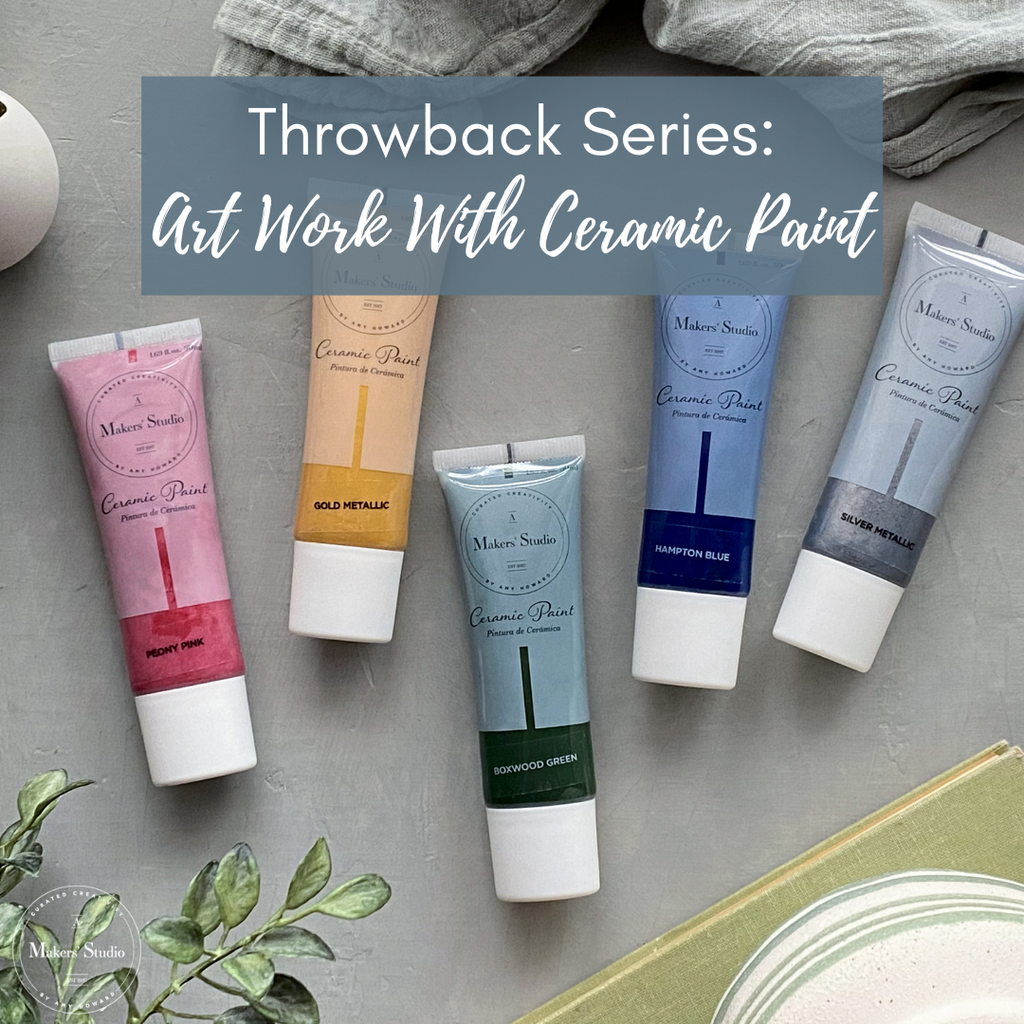
Throwback Series: Art Work With Ceramic Paints
Welcome to our NEW Throwback Series! In this series, we will be highlighting some of our favorite projects, and showing you how to do them. Sit back, relax, and watch as we uncover some of our most loved projects. Today, Amy shows you how she uses our Ceramic Paint to create beautiful works of art!
Shop What She Used
- Hot & Spicy - Ceramic Paint
- You're The Water To My Ocean - Ceramic Paint
- Green With Envy - Ceramic Paint
- Tally Ho - Ceramic Paint
- Black - Ceramic Paint
HOW TO
Step One
Thin Down Ceramic Paint With Water ( Two Parts Ceramic Paint With One Part Water)
Step Two
Pour Ceramic Paint Mixture On Top Of Coffee Mug (Be Sure To Have A Bowl Underneath To Catch The Excess)
Step Three
Use A Straw To Blow Around The Paint
Step Four
Continue Steps Two And Three Until Satisfied
Step Five
Bake In Oven For 25-30 Minutes at 325 Degrees
Product Highlight

A Makers' Studio No Bake Ceramic paint lays a rich, permanent color on ceramic and glass surfaces and it's food safe!
What you'll love:
- Create your own custom dishes, vases, and glasses with vibrant pops of color (best on ceramic, porcelain, vases, glass, jars or fine china).
- It's so easy! Just apply it to your surface with your favorite A Makers' Studio stencils!
- This medium is food safe and microwave safe. For best results hand wash only.
Join in the fun of customizing platters, dishes, vases, glasses, etc. The possibilities are endless!
Instructions for Use:
- Clean your surface before application and make sure it is completely dry.
- Place your stencil or lay-out your freehand design. Make sure that there are no bubbles if using a Mesh Stencil, or the medium will go under.
- Use a ChalkArt Spreader or firm brush to push the paint through the mesh in the stencil - it must get through the mesh and not just sit on top of it.
- Peel the stencil and immediately wash it. If there are any spots with bleed or you went over the stencil edge, remove these with a wet q-tip. Allow the no bake ceramic paint to dry for 12 - 14 hours. If you want to speed up the cure time of your piece and give it more durability, we recommend baking your piece. Bake for 25 minutes on 350 degrees, let the piece cool down in the oven.
- You can then enjoy using your new custom creations!
Things To Know:
- Hand wash your piece ONLY! Do not use in the Dishwasher!
- Our No Bake Ceramic Paint is food and microwave safe!
- You can water the paint down and use it more as a watercolor medium!
Easy DIY Cutting Board Decor
Turn a cheap cutting board into a timeless piece of decor for your kitchen! Kerri from Mama Dares To DIY uses just two products to create this stunning cutting board.
Shop our brand NEW Cook It Yourself Mesh Stencil
Shop what she used:
From This

To This
